Looking for some Easter recipe ideas? We’ve pulled a few of our favourites from the past for you to check out!


Overwinter(ed)
This past week kicked off with some gorgeous sunny days! Monday through Wednesday saw temperatures upwards of 18°C!
This sunshine inspired our clever little email title here — overwinter(ed). In many ways, it feels like we are over winter, and it’s full steam ahead to spring. There’s action in the fields already, and our heated greenhouse is starting to fill up with seedlings! Looking ahead at next week the temperatures will be dipping back down, but either way we are getting so excited for what’s to come.
As we look ahead and prepare, we are also excited to have a good number of overwintered crops stashed away, which will help bulk up our spring Market Box and Farmers’ Market offerings. More on those overwintered items in a bit!
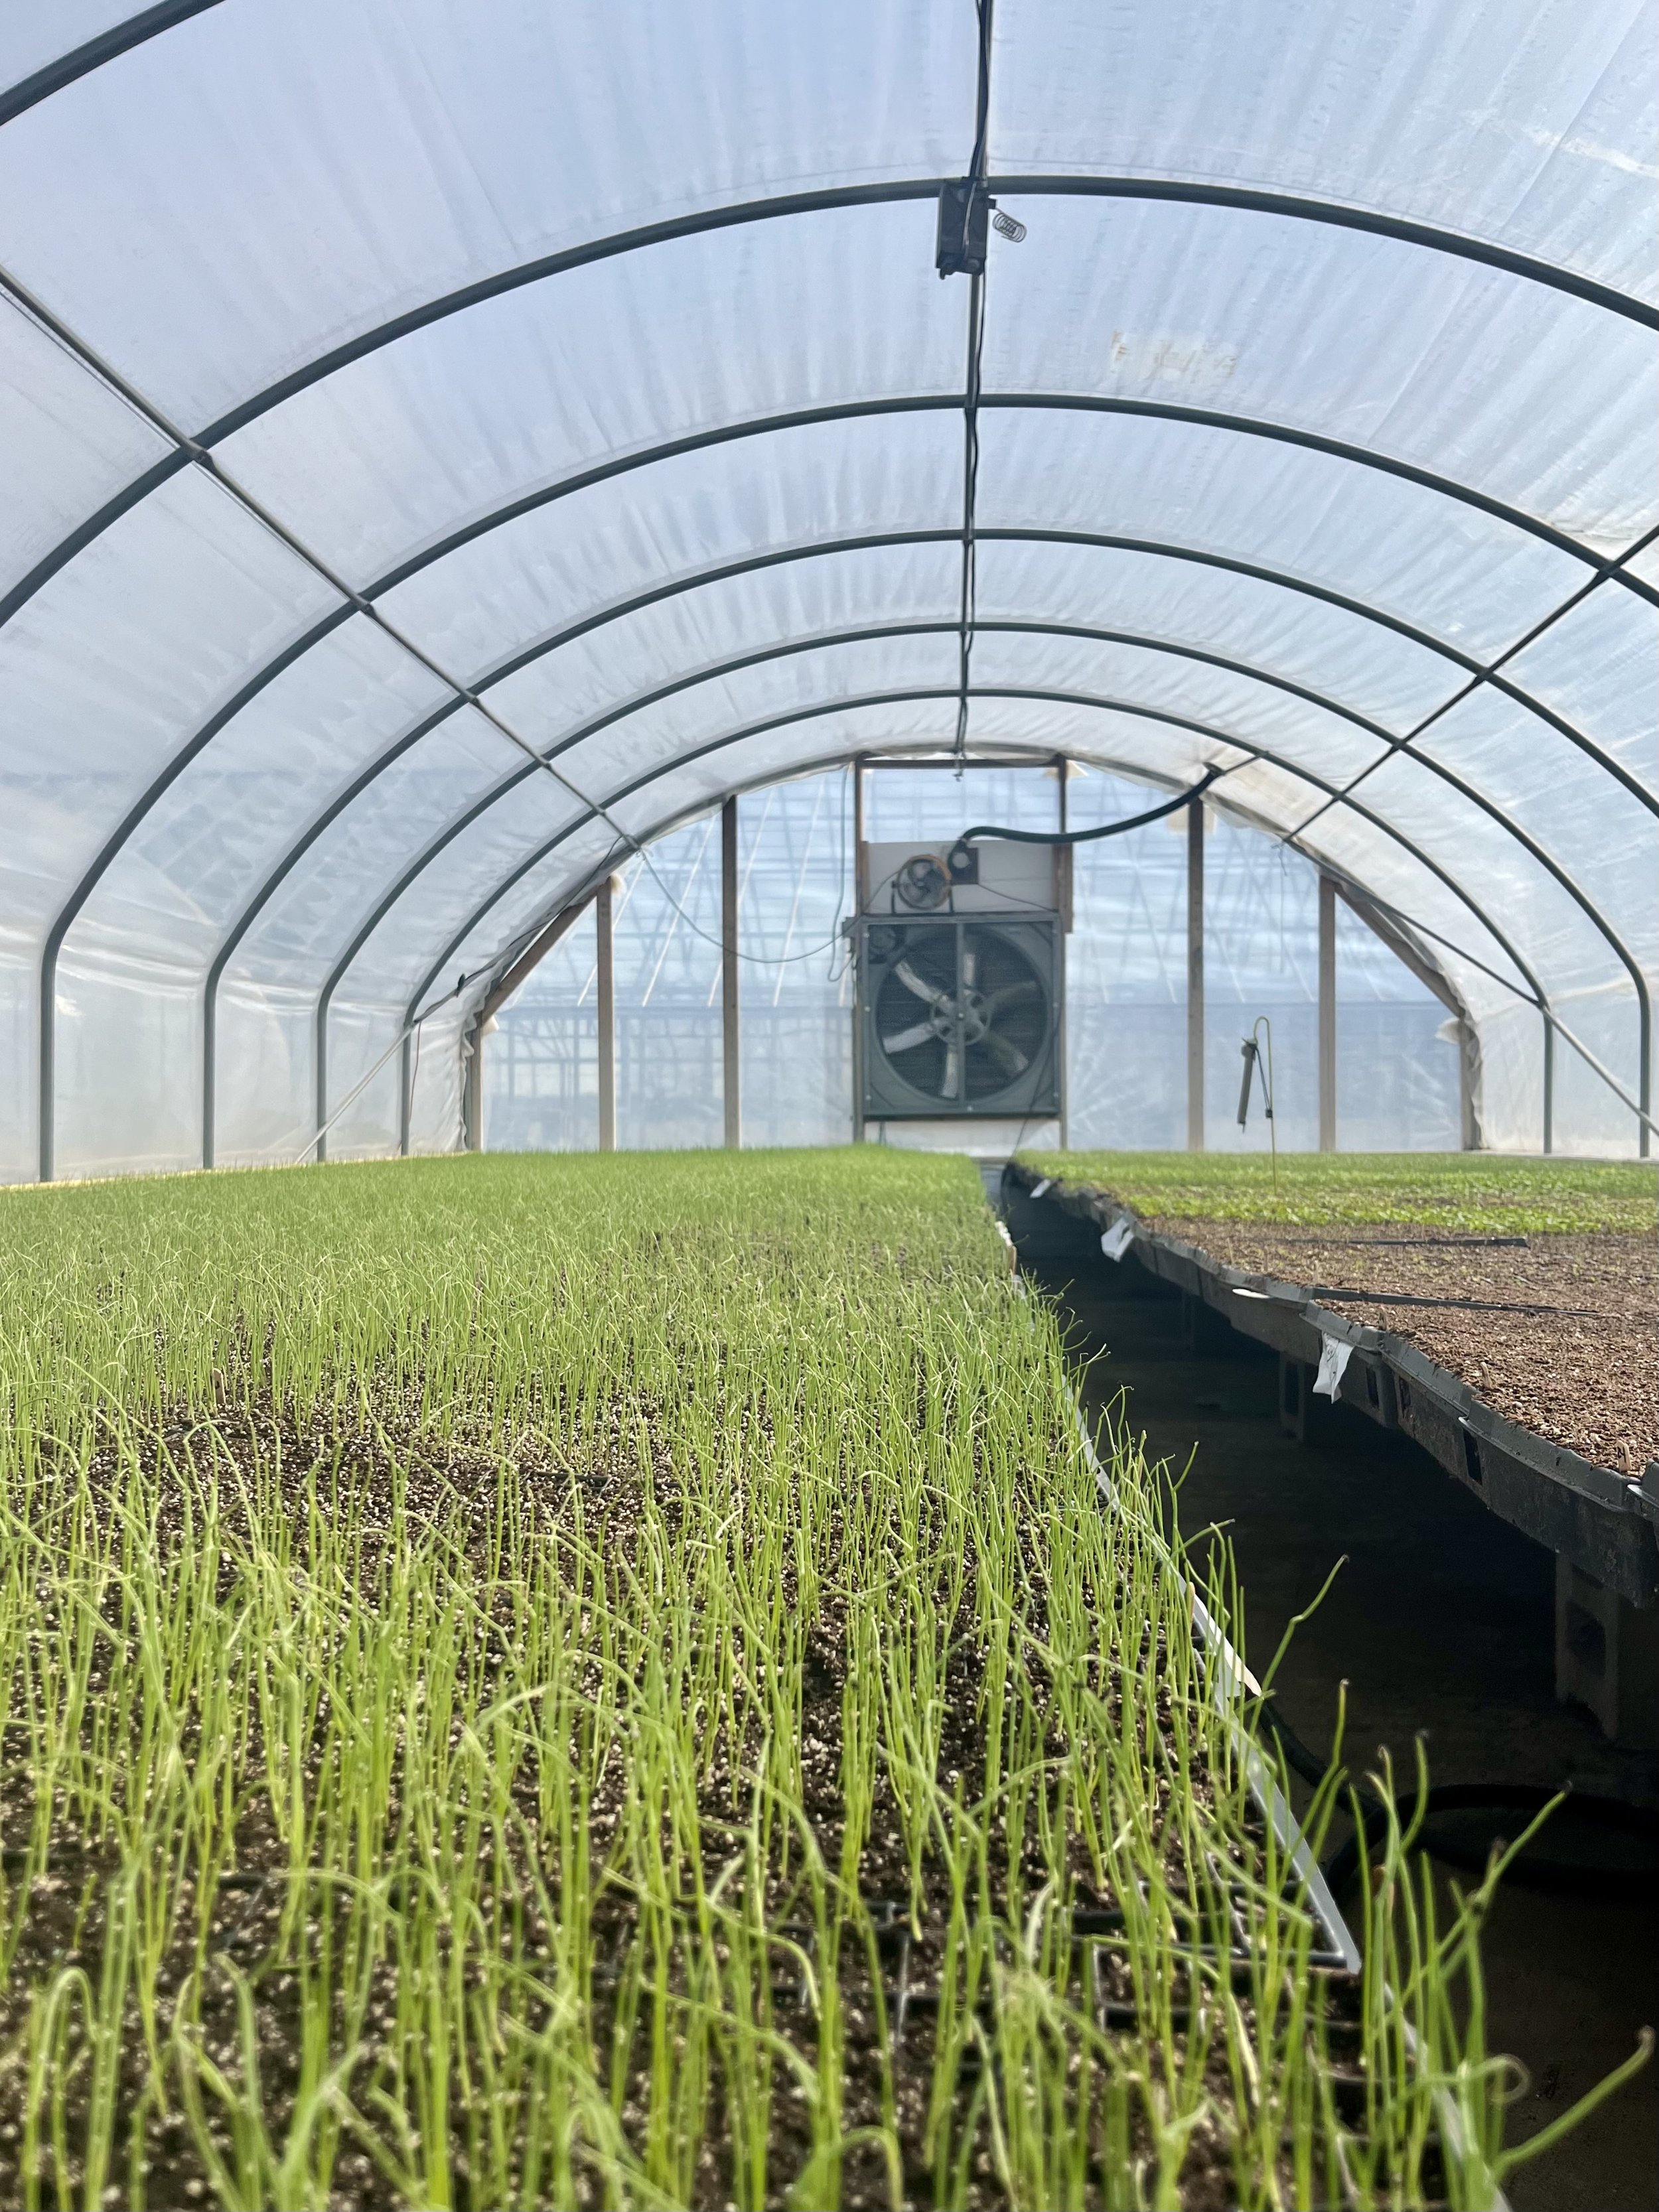
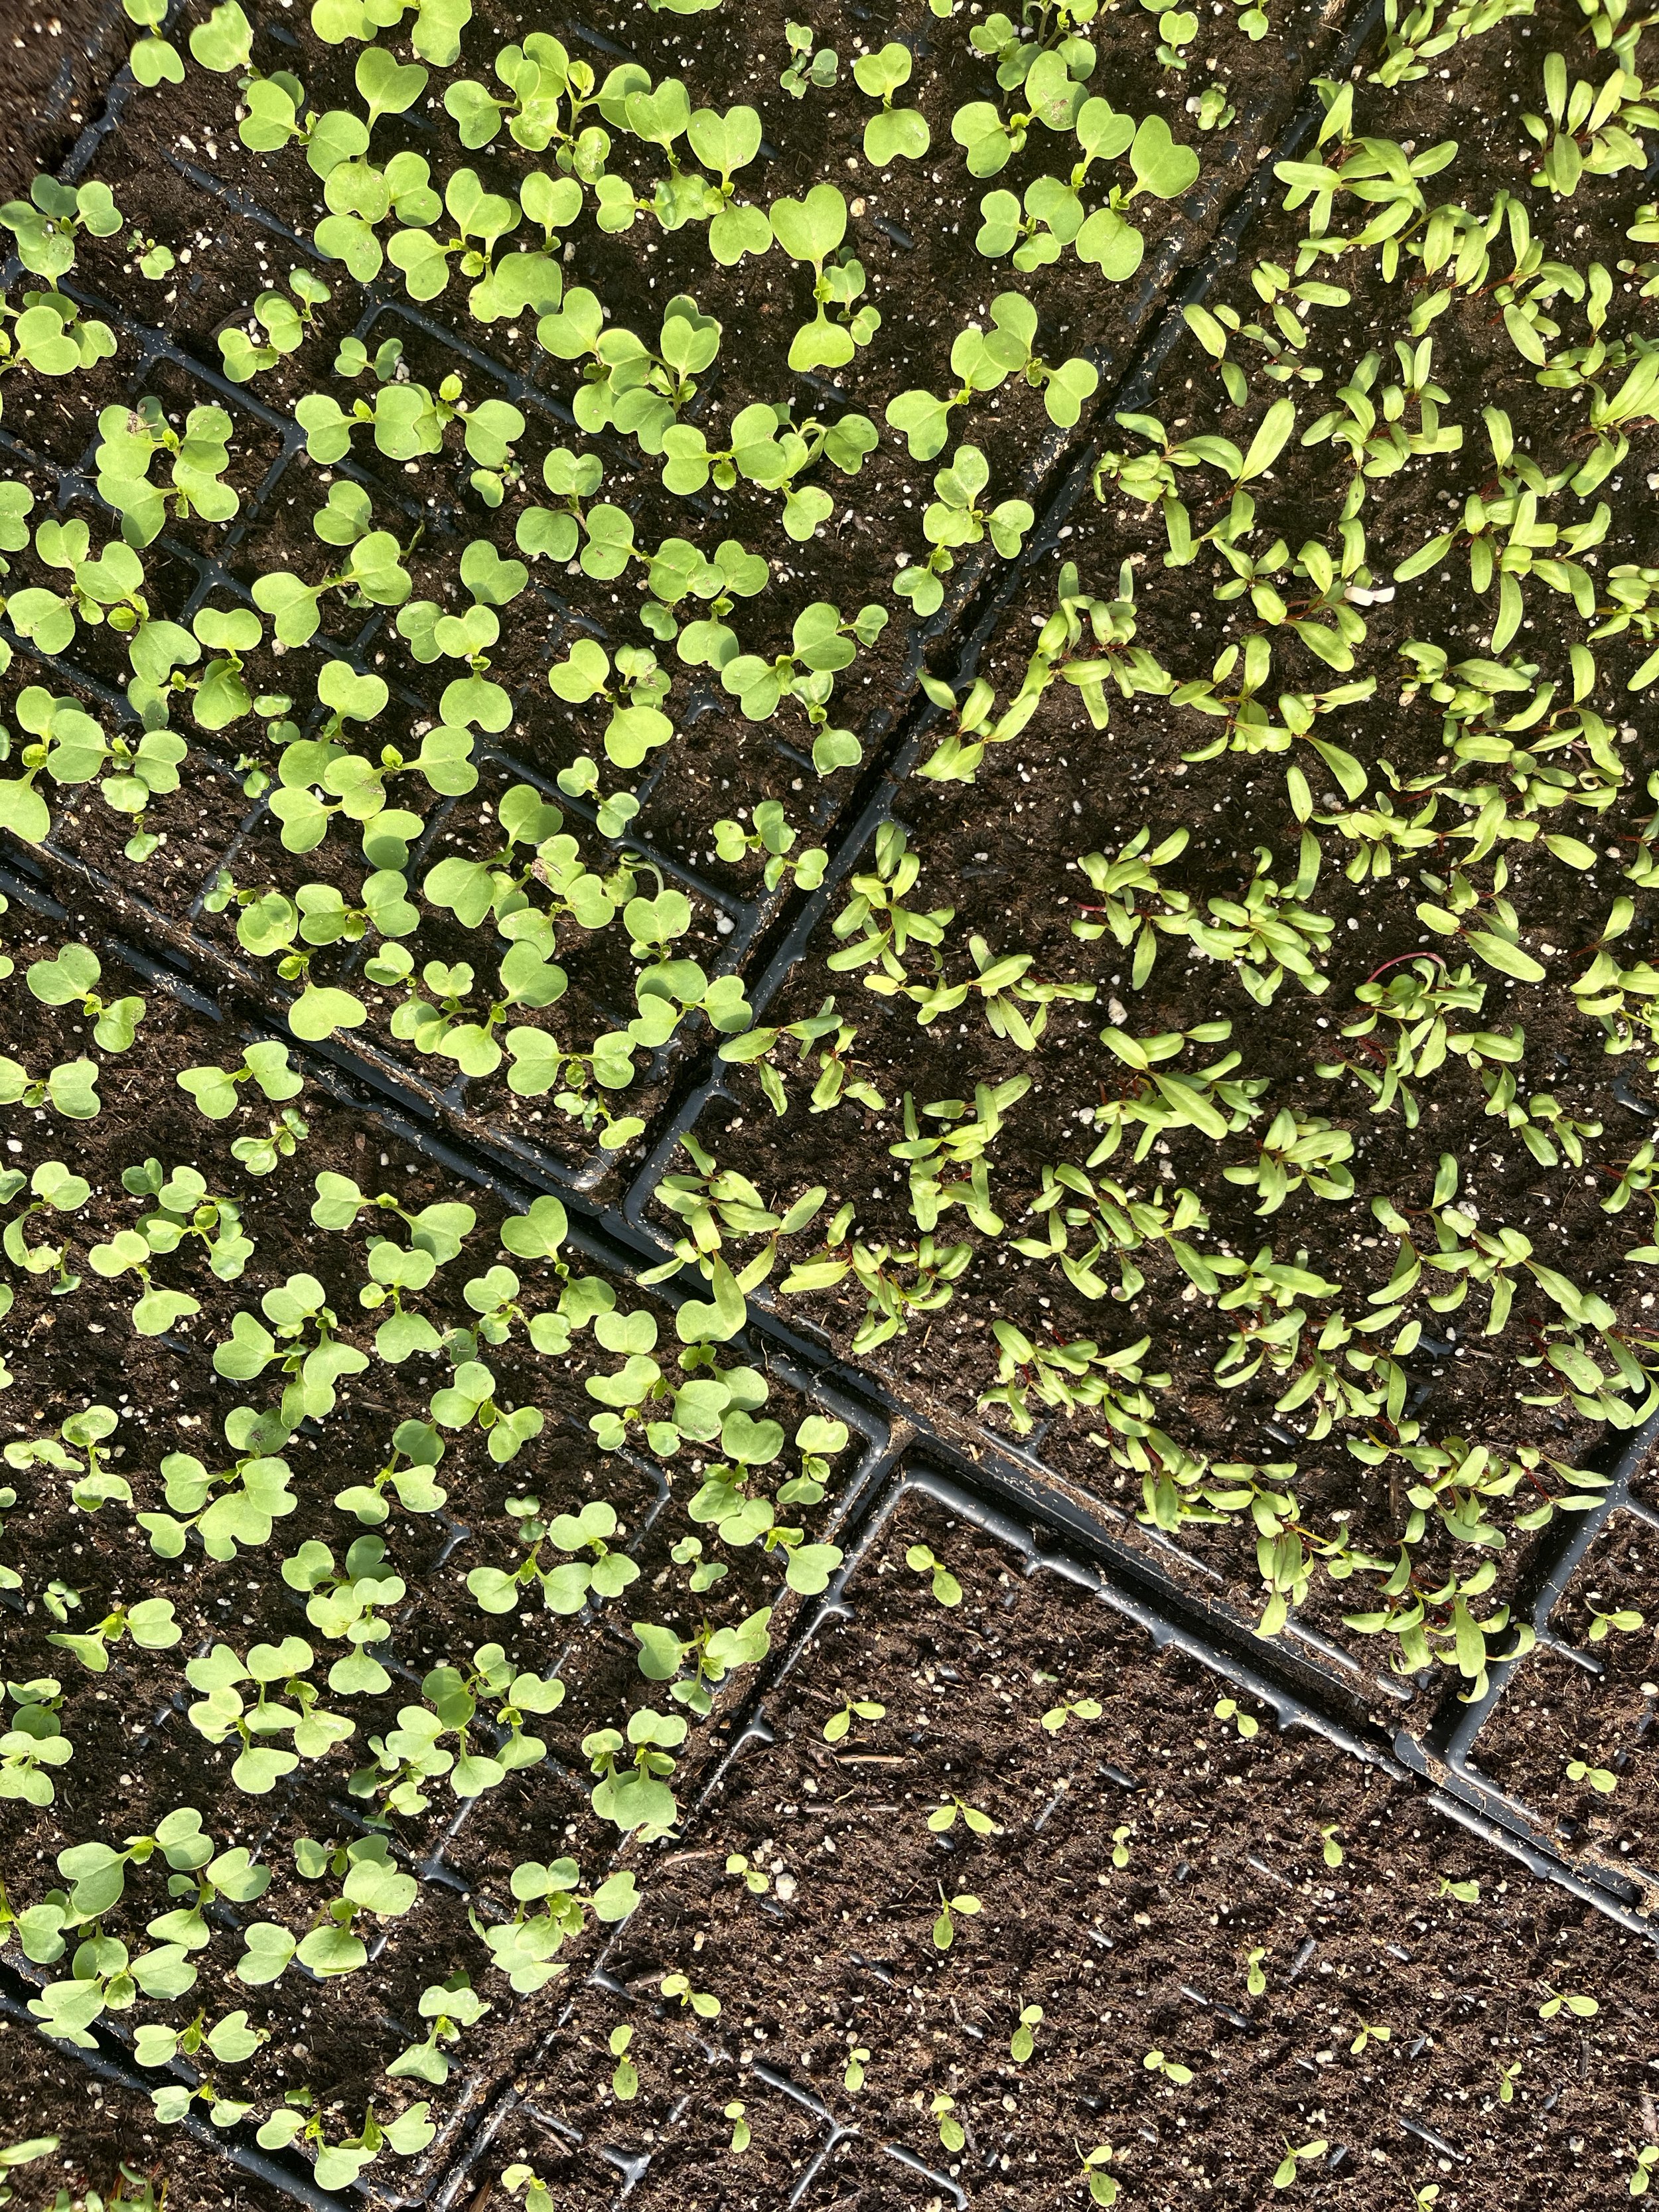
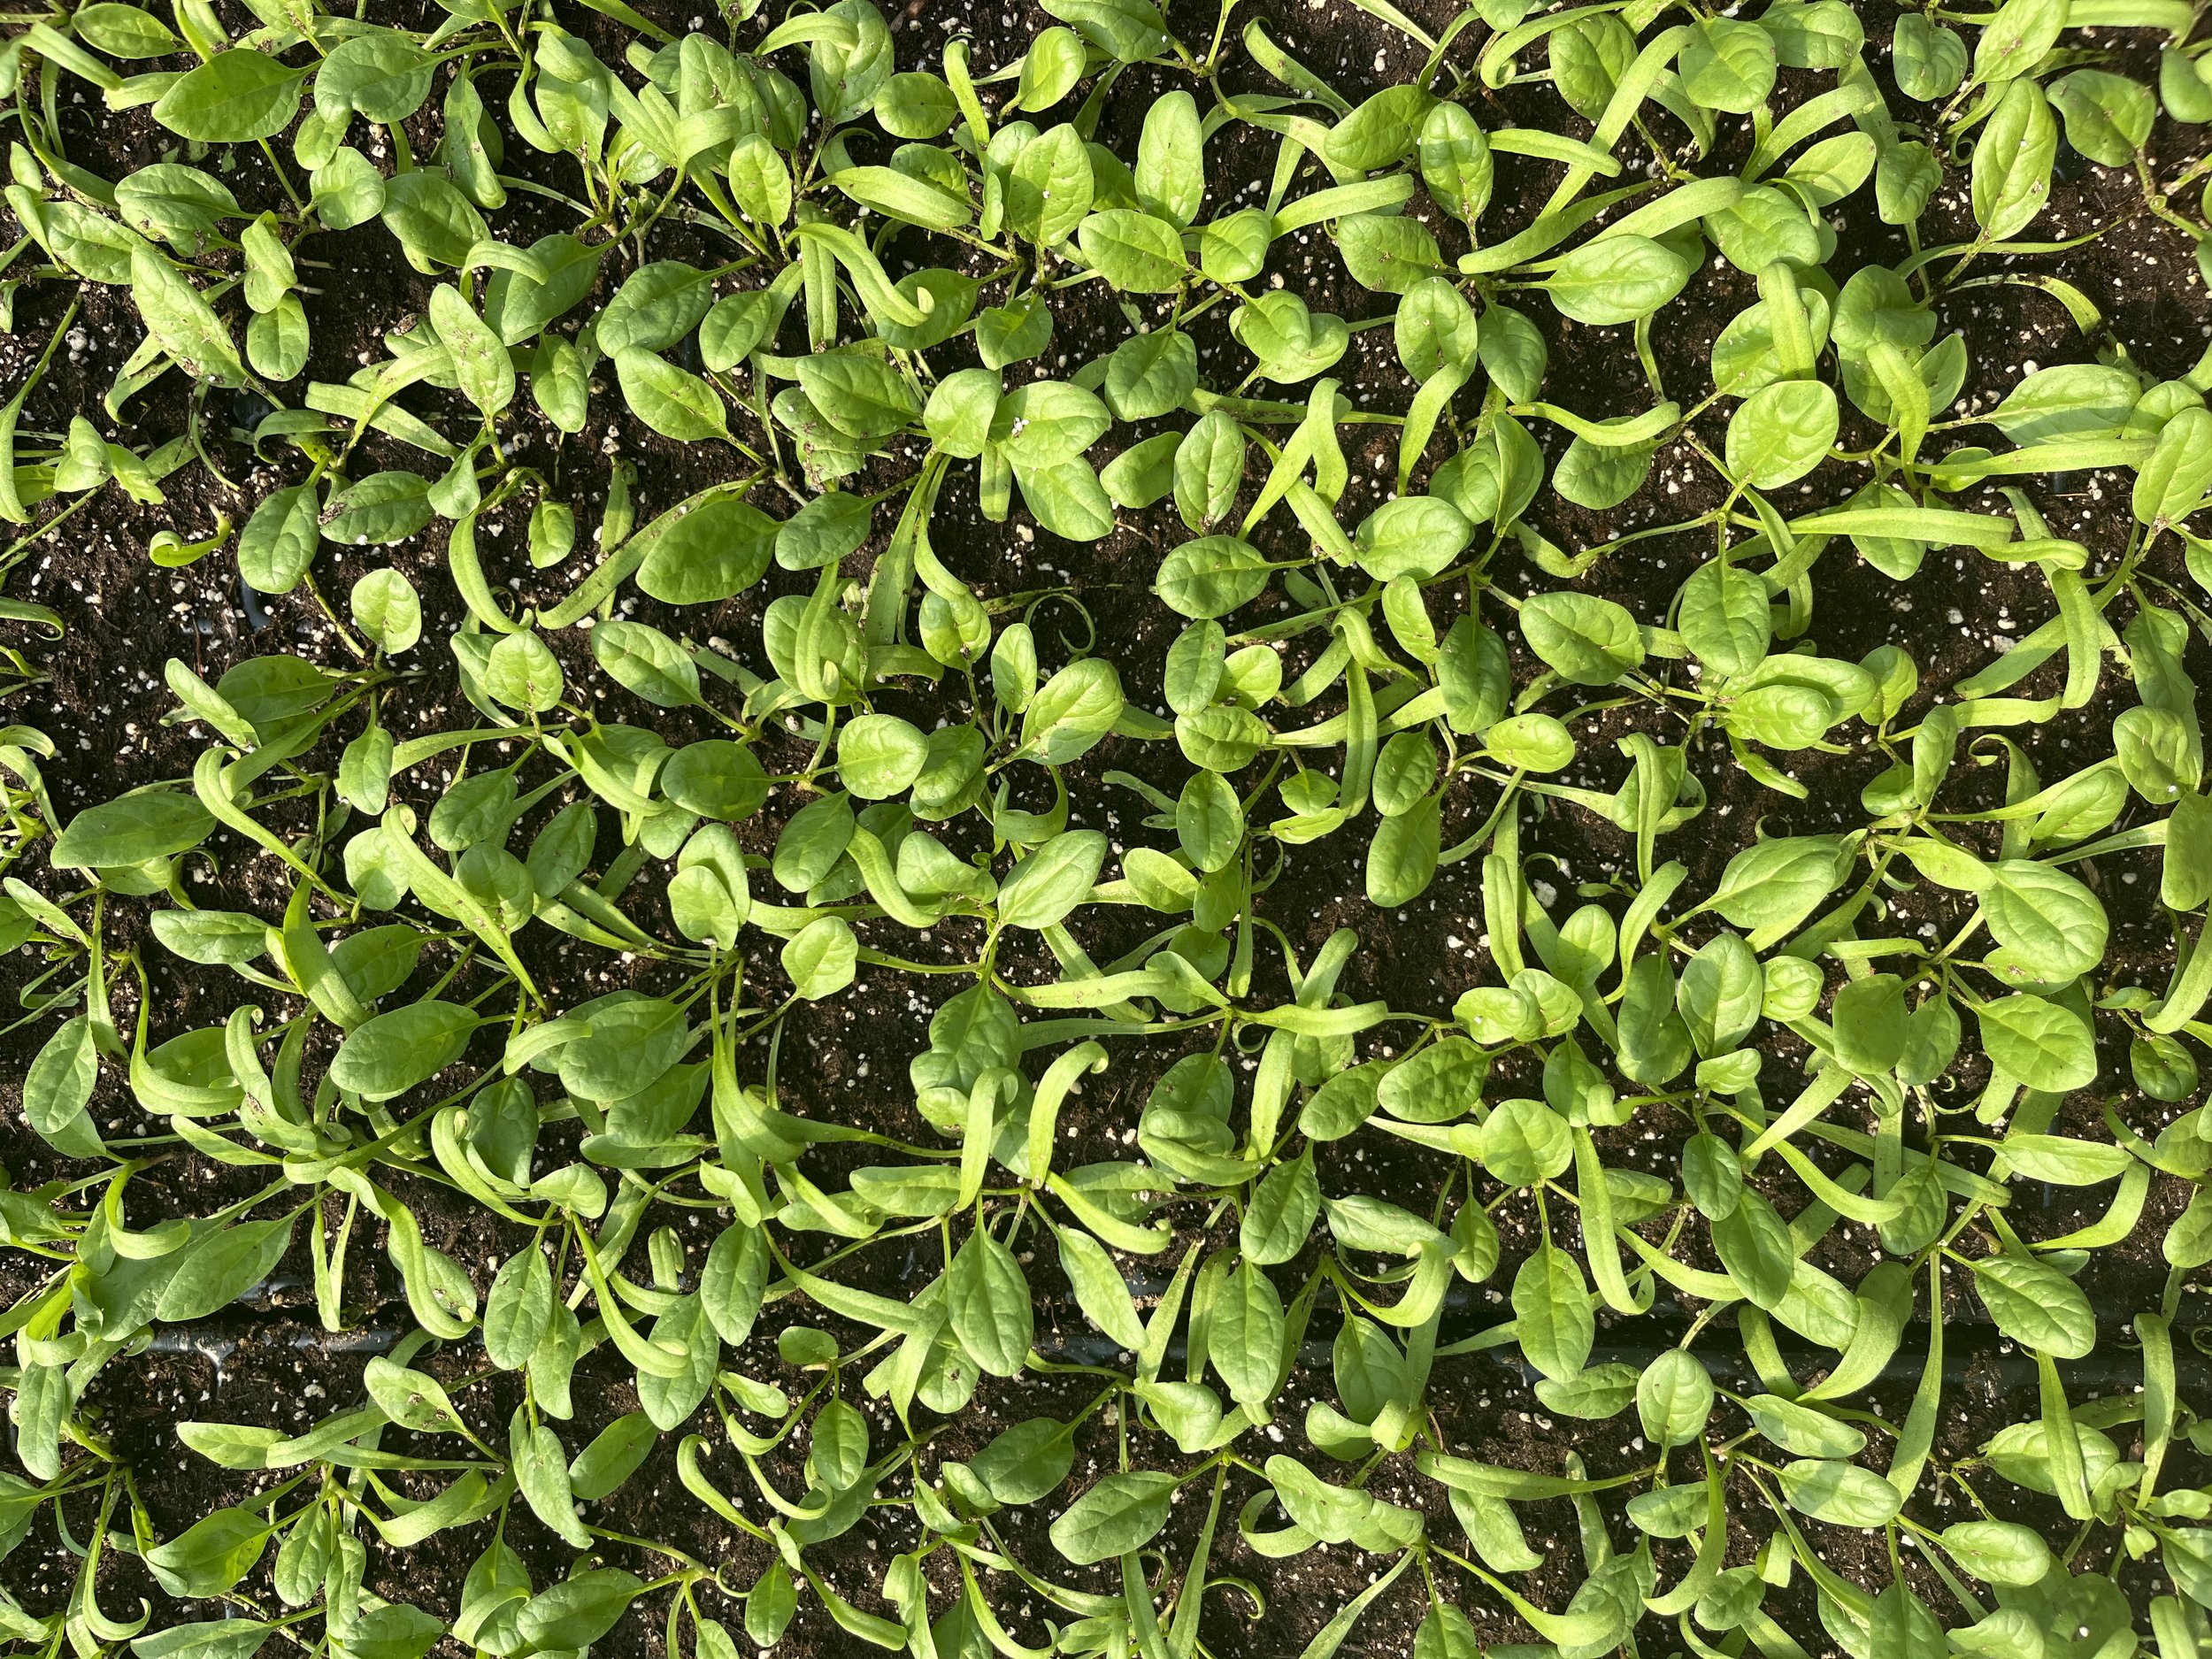
Pictured above are some shots from our heated greenhouse. As you may remember from our updates last March, we start many of our crops in trays, in a greenhouse (either our small heated one, or our larger glass one). Right now we have a patchwork quilt looking mix of Swiss Chard, spinach, mustard green, onions, and shallots in our heated greenhouse. It’s a lovely view! And it’s very exciting to know that all of these fresh goodies will soon be heading our way.

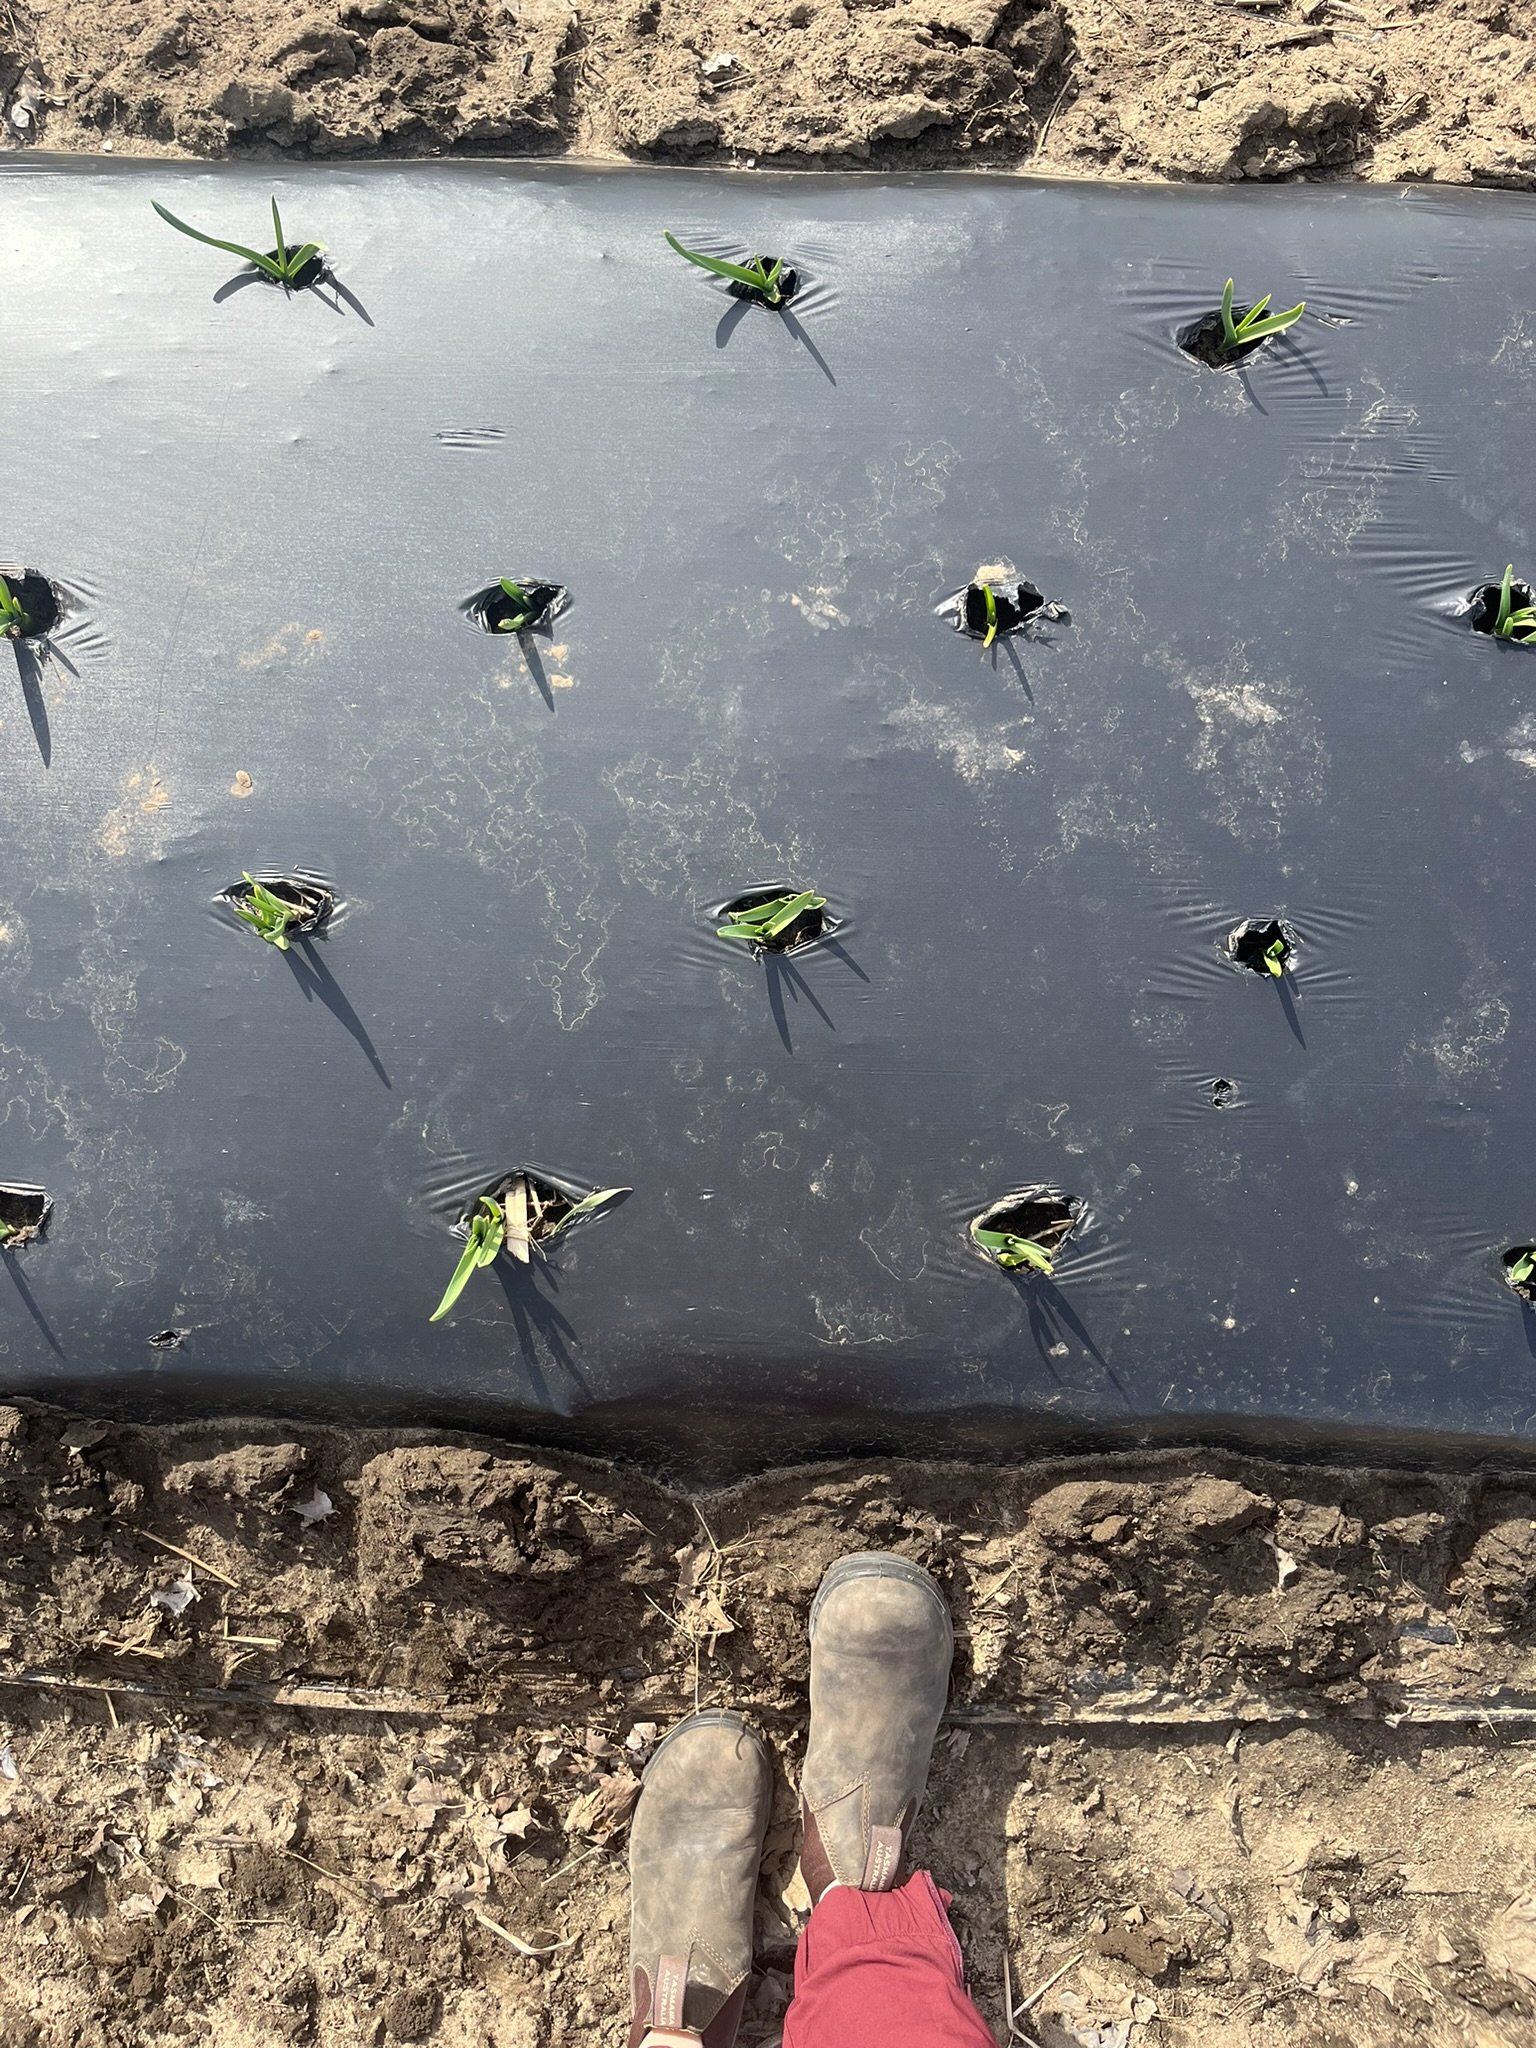
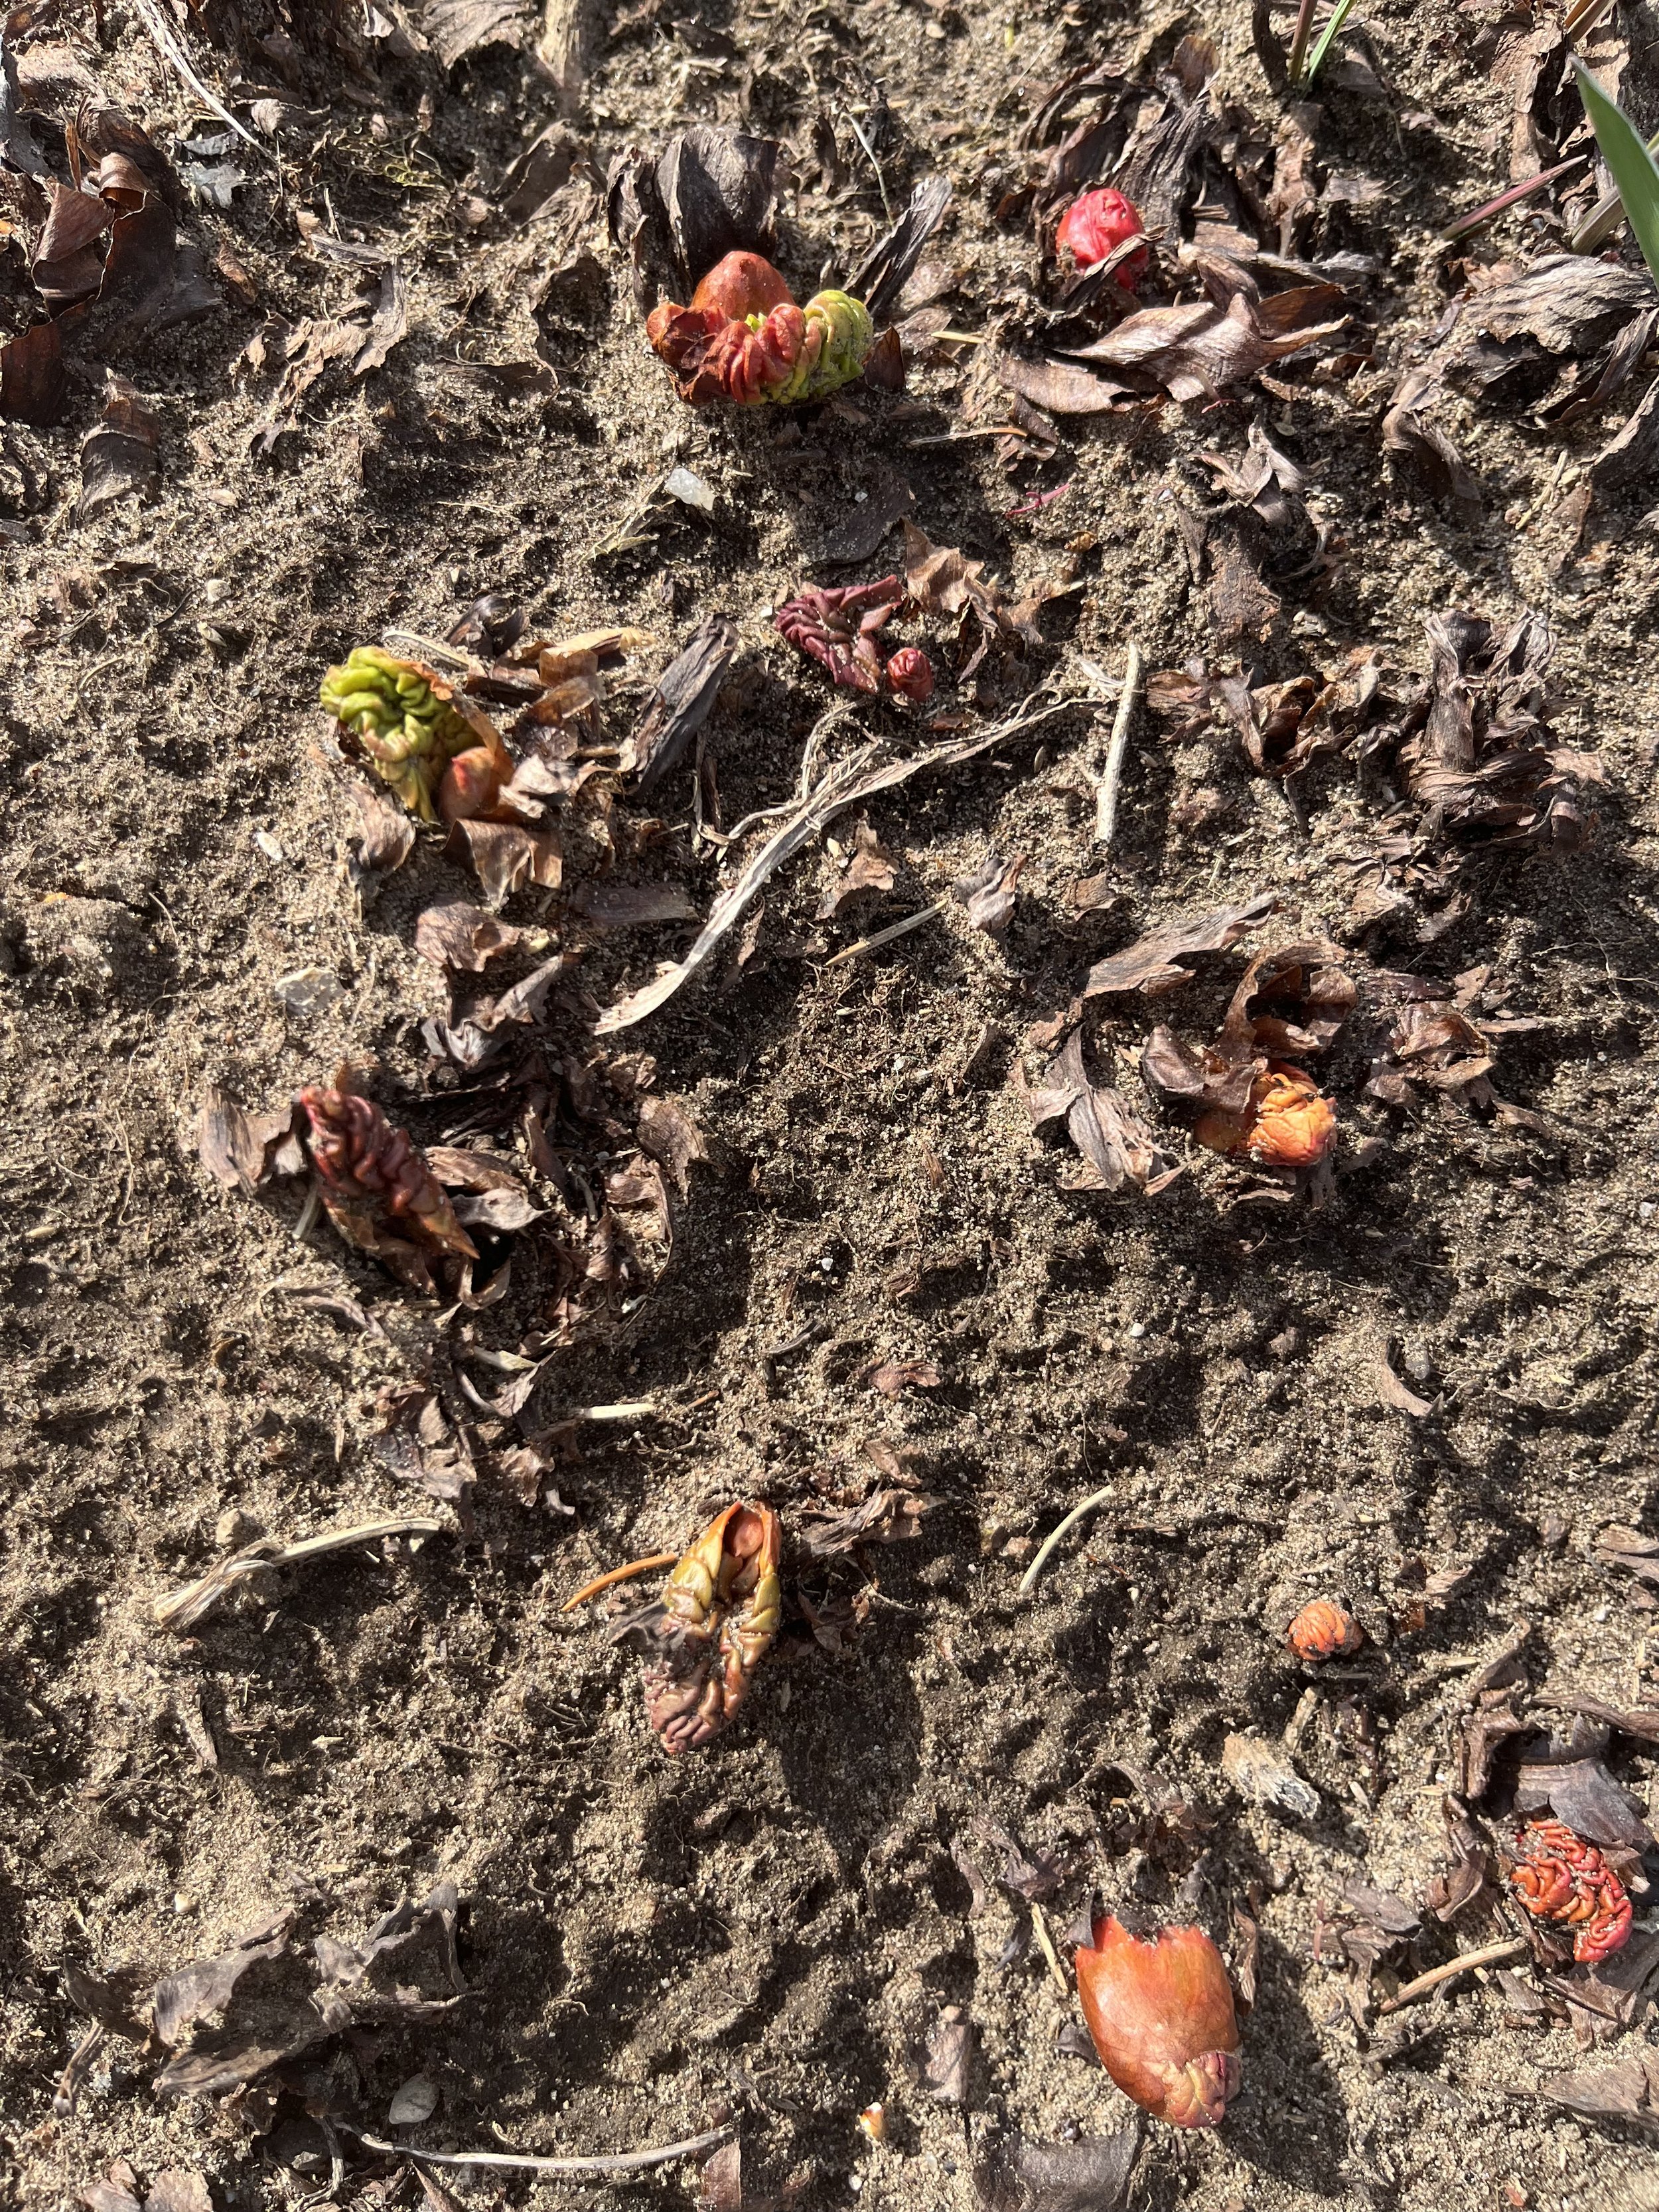
Out in the fields, we are already seeing the first sign of growth. To be honest, it’s pretty early for temperatures like this! We were looking through our records, and typically the first sign of rhubarb (the photo on the right just above) isn’t poking up through the soil until closer to the last week of March. But, we’re rolling with it! We are no strangers to unpredictable and strange weather patterns; it’s pretty much a given in farming. We will make it work! We are also seeing signs of the first green garlic (aka baby garlic). If you aren’t familiar, take a peek at some of these recipes for some early inspiration.
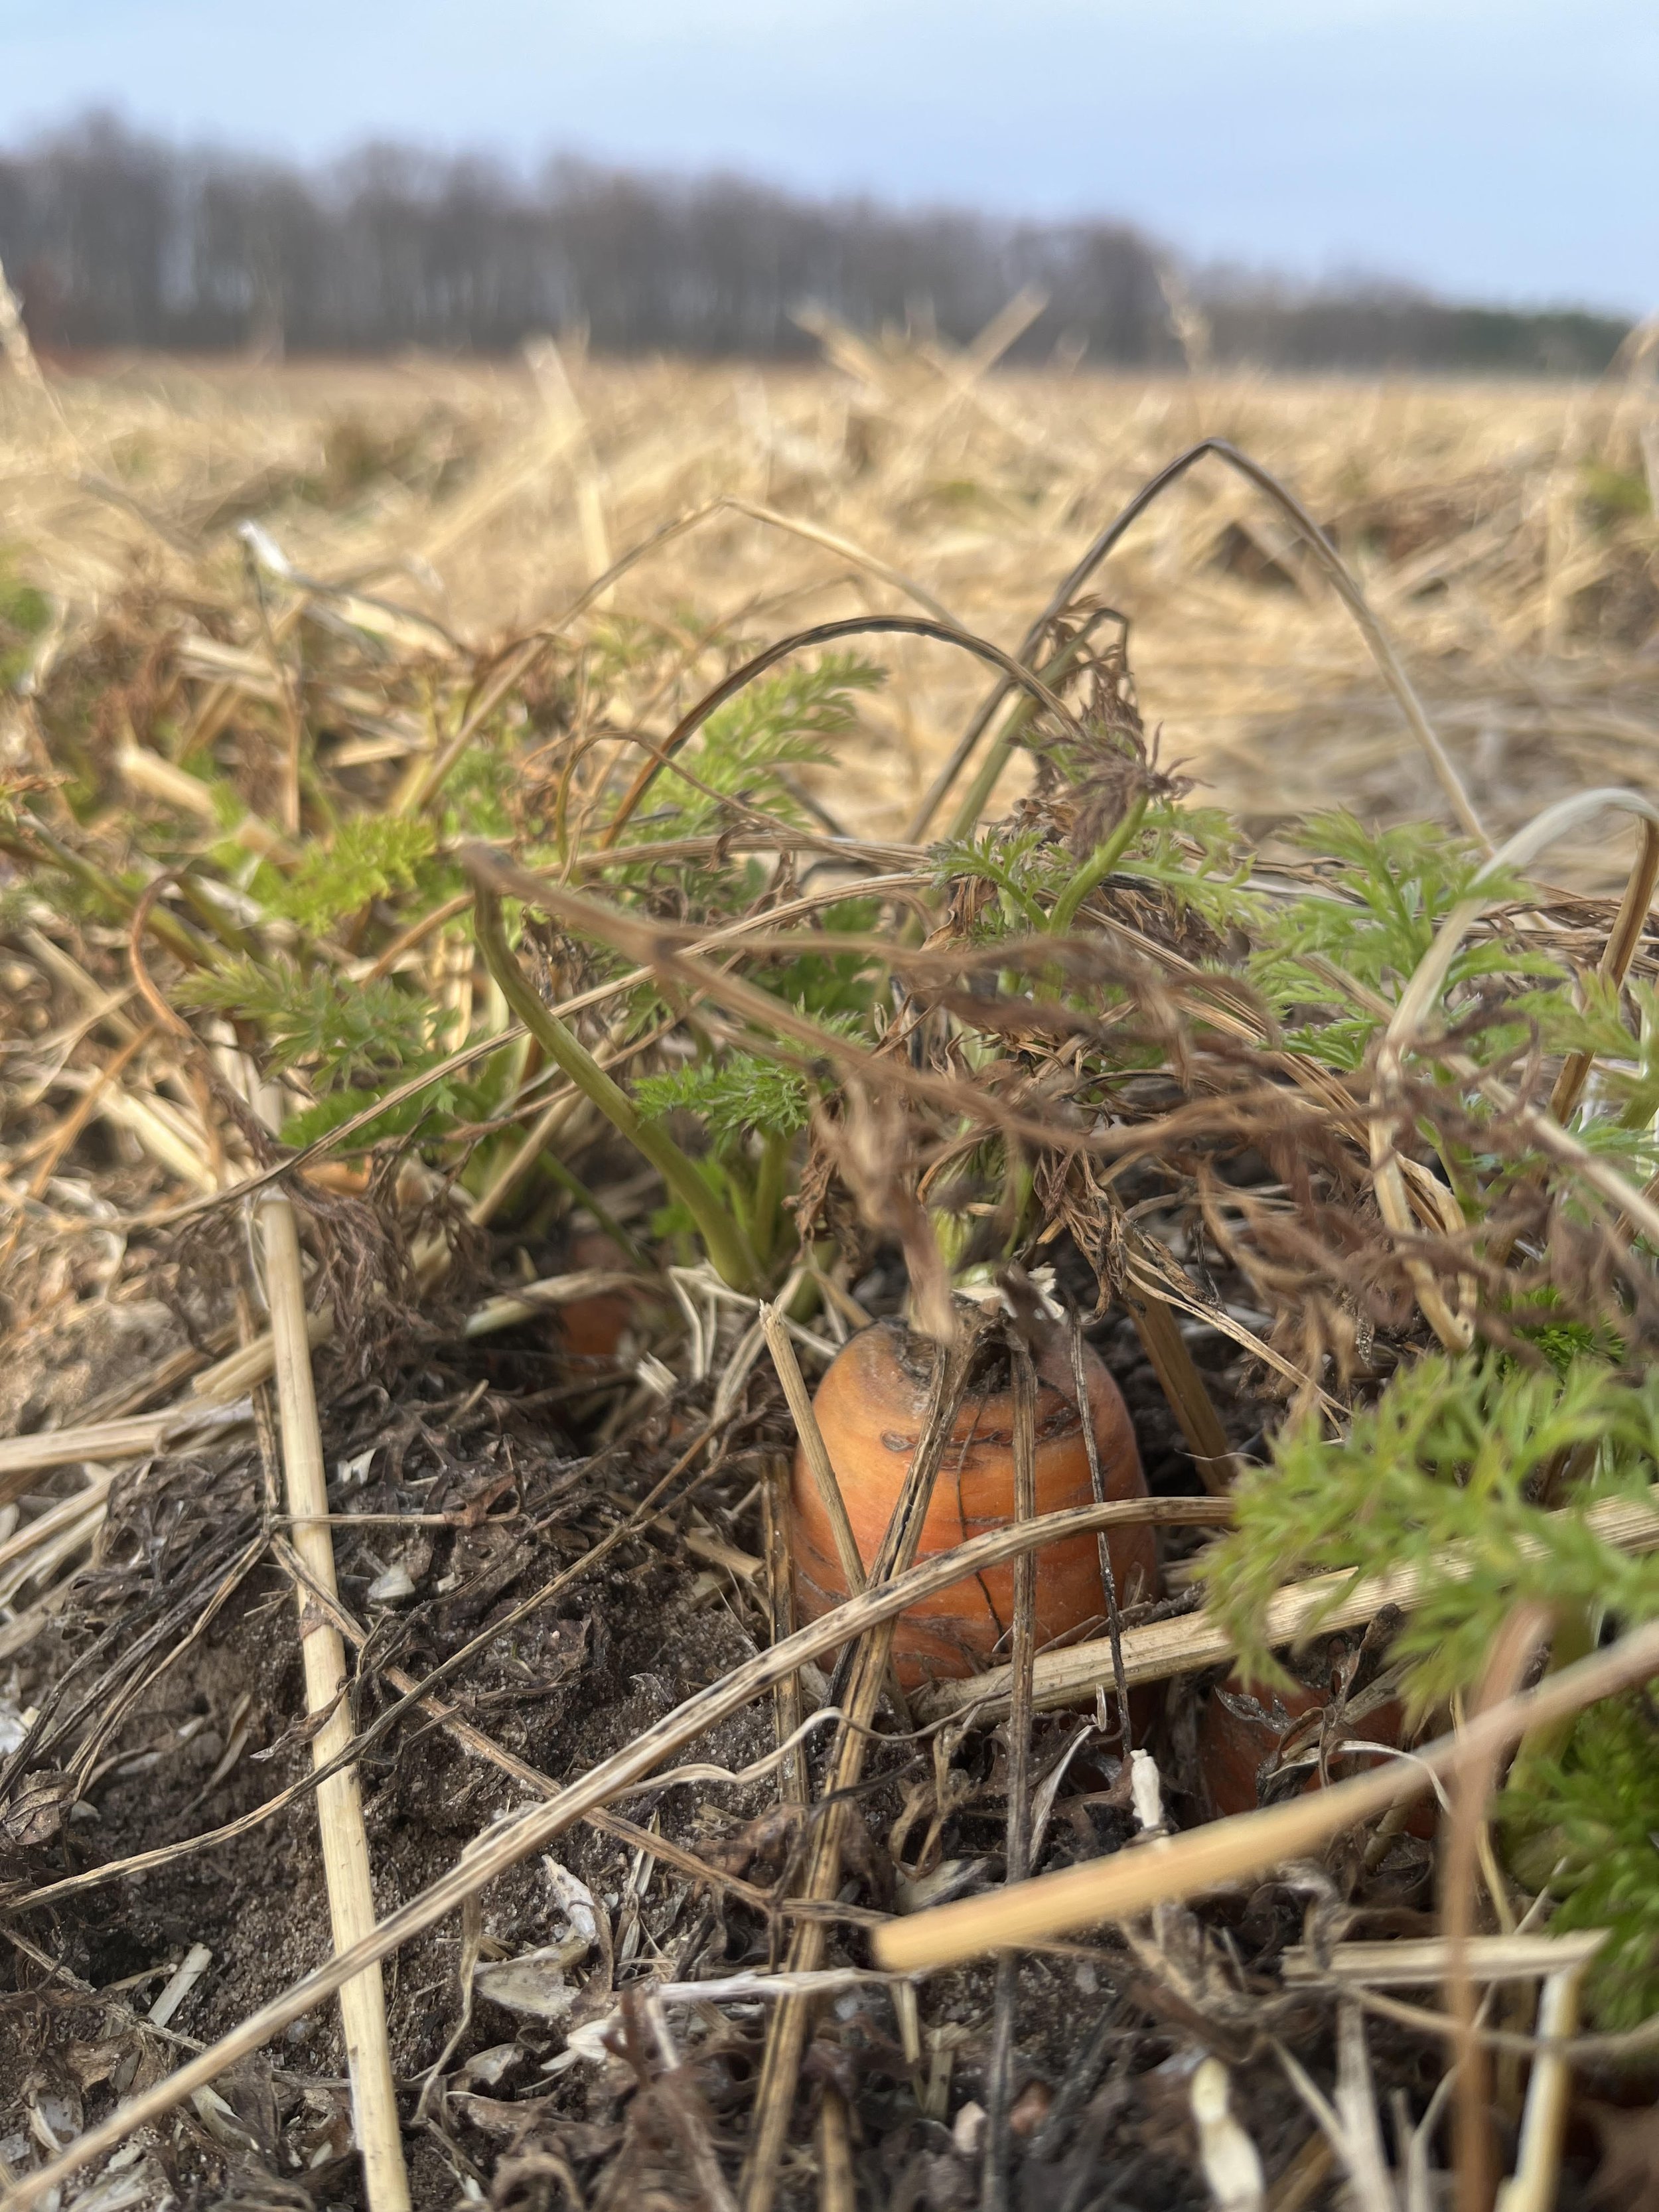
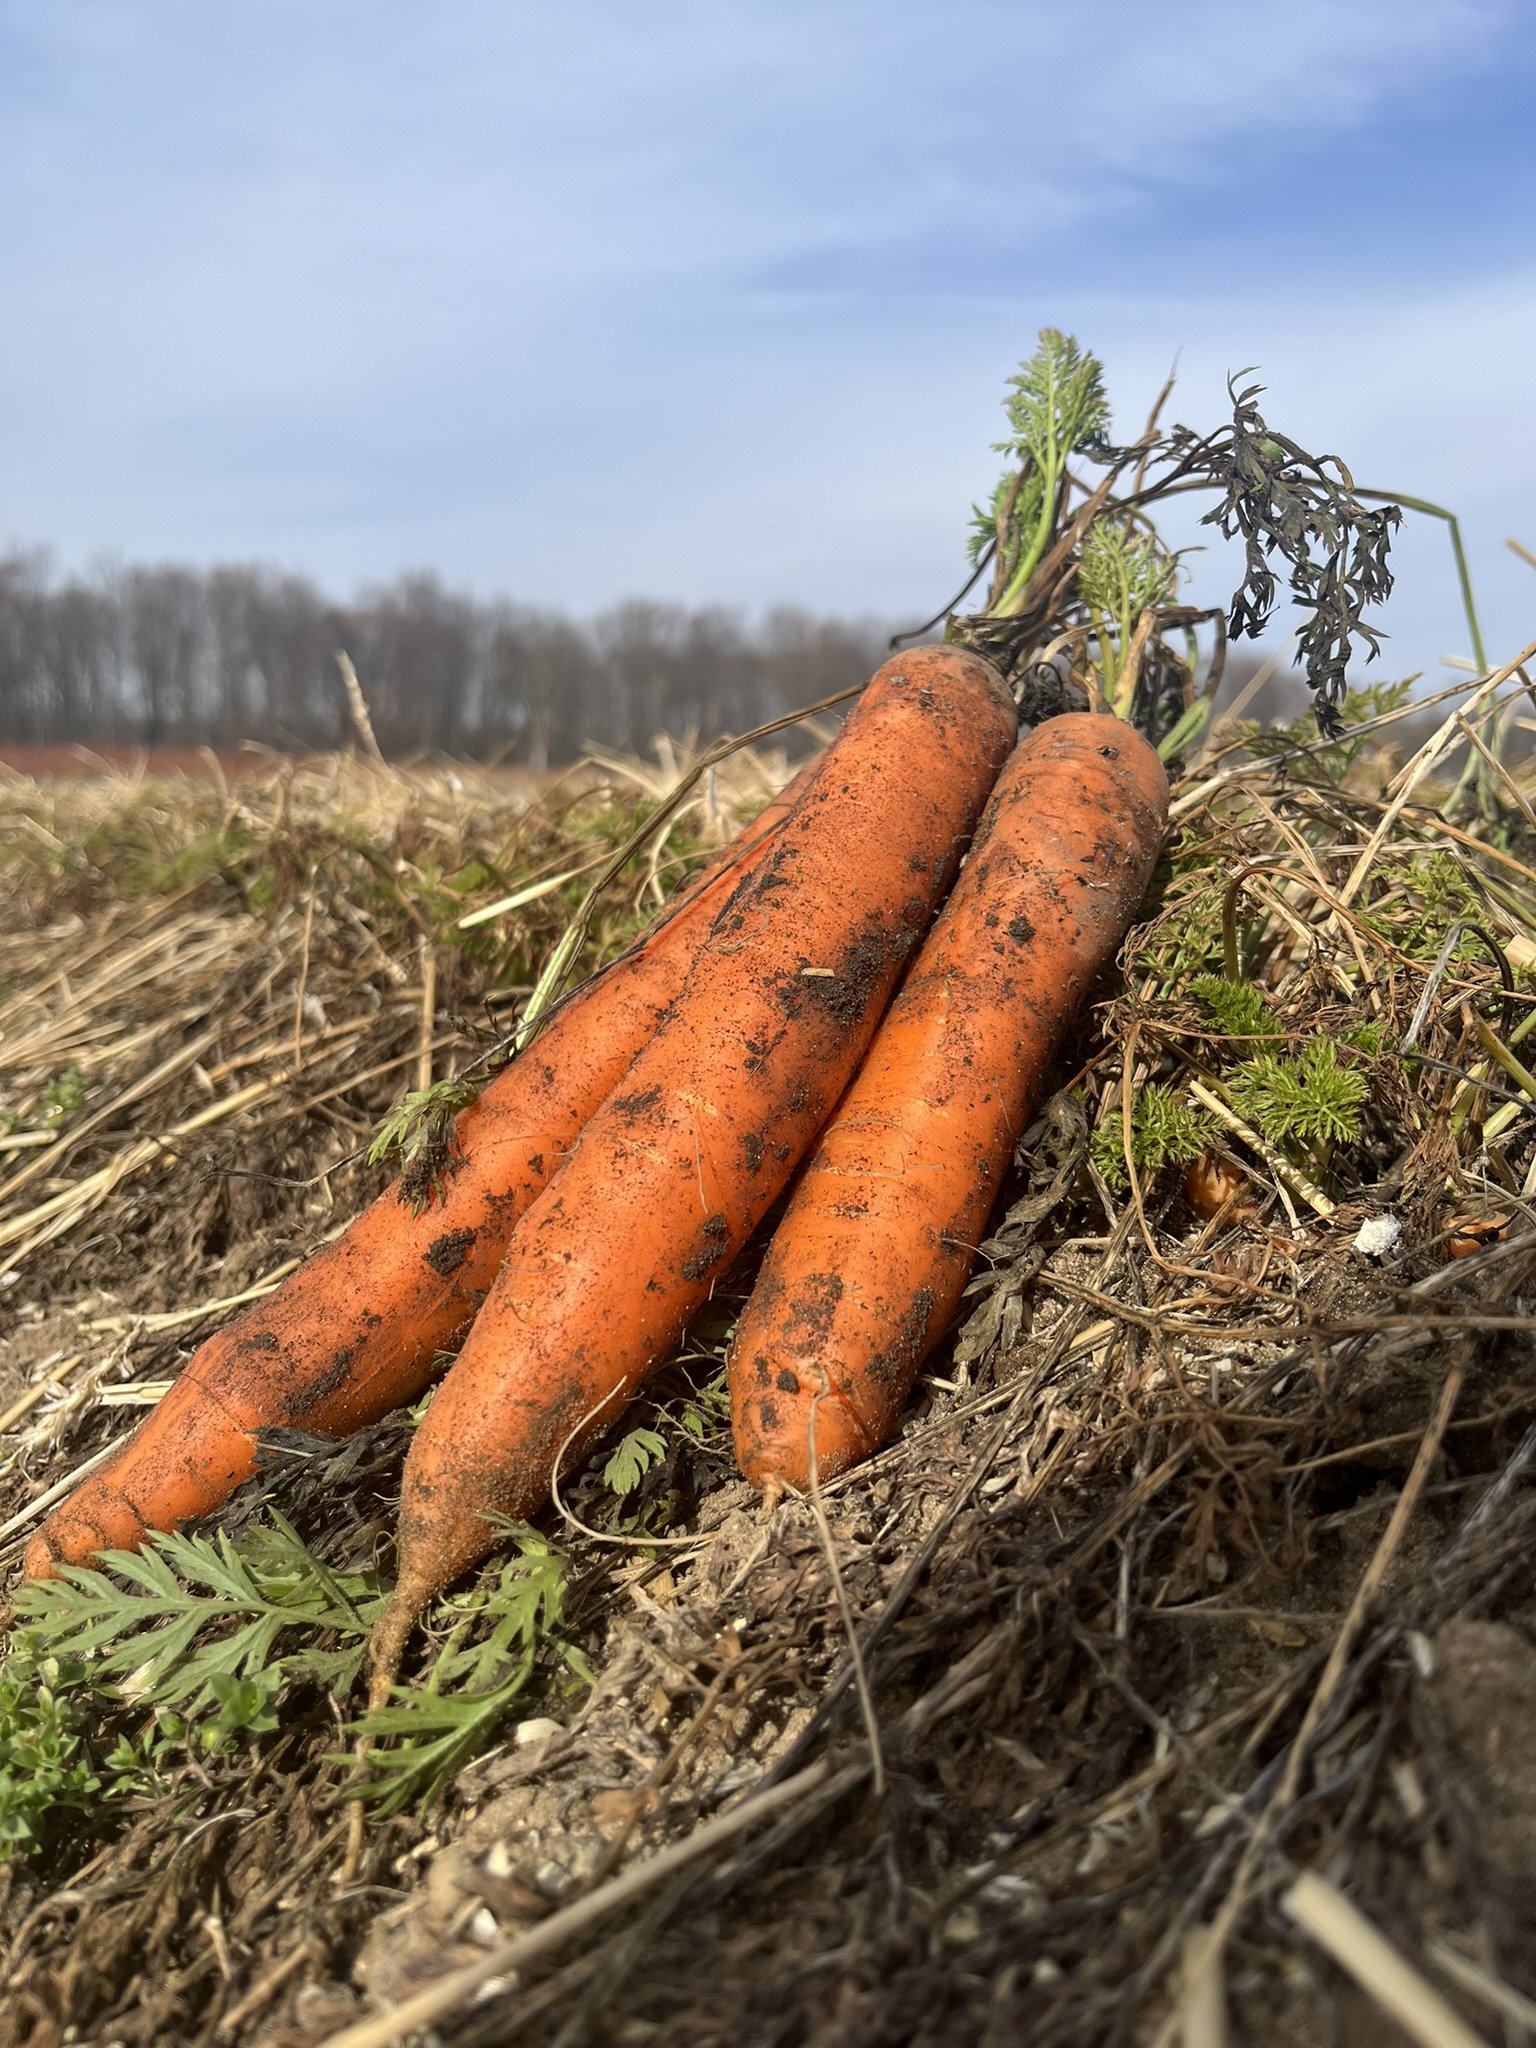
We also successfully overwintered some carrots for the first time, and are so thrilled to have an extra pop of colour and flavour on hand for one of our May Market Boxes. We’ve been test-tasting and can confirm that they are still delicious!
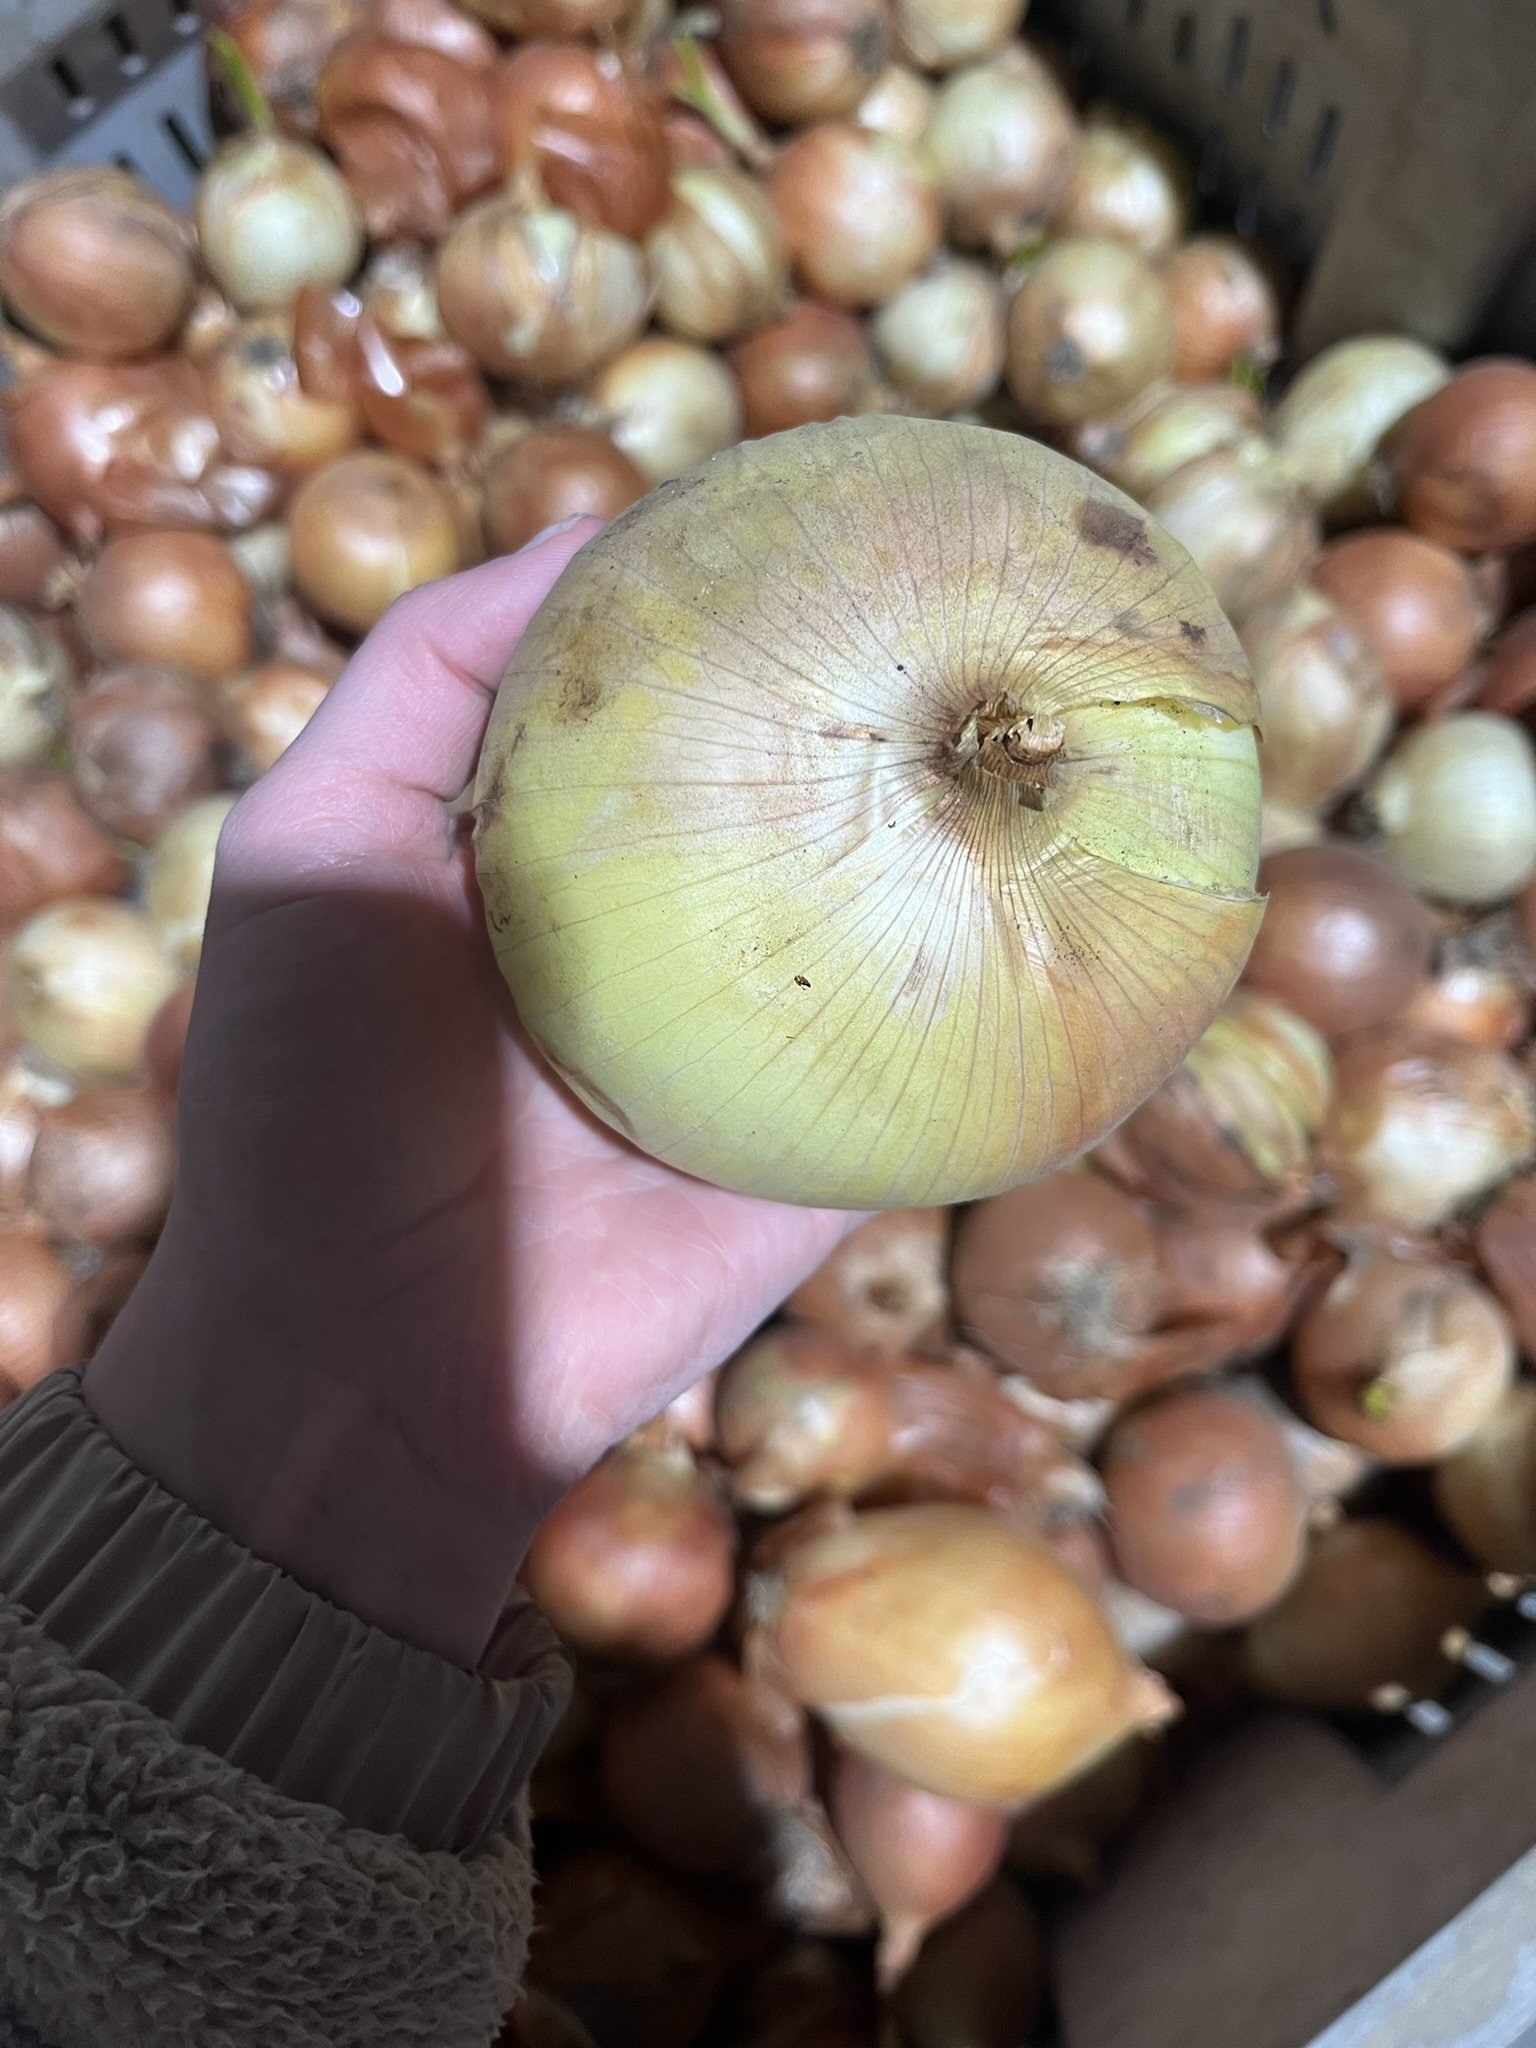
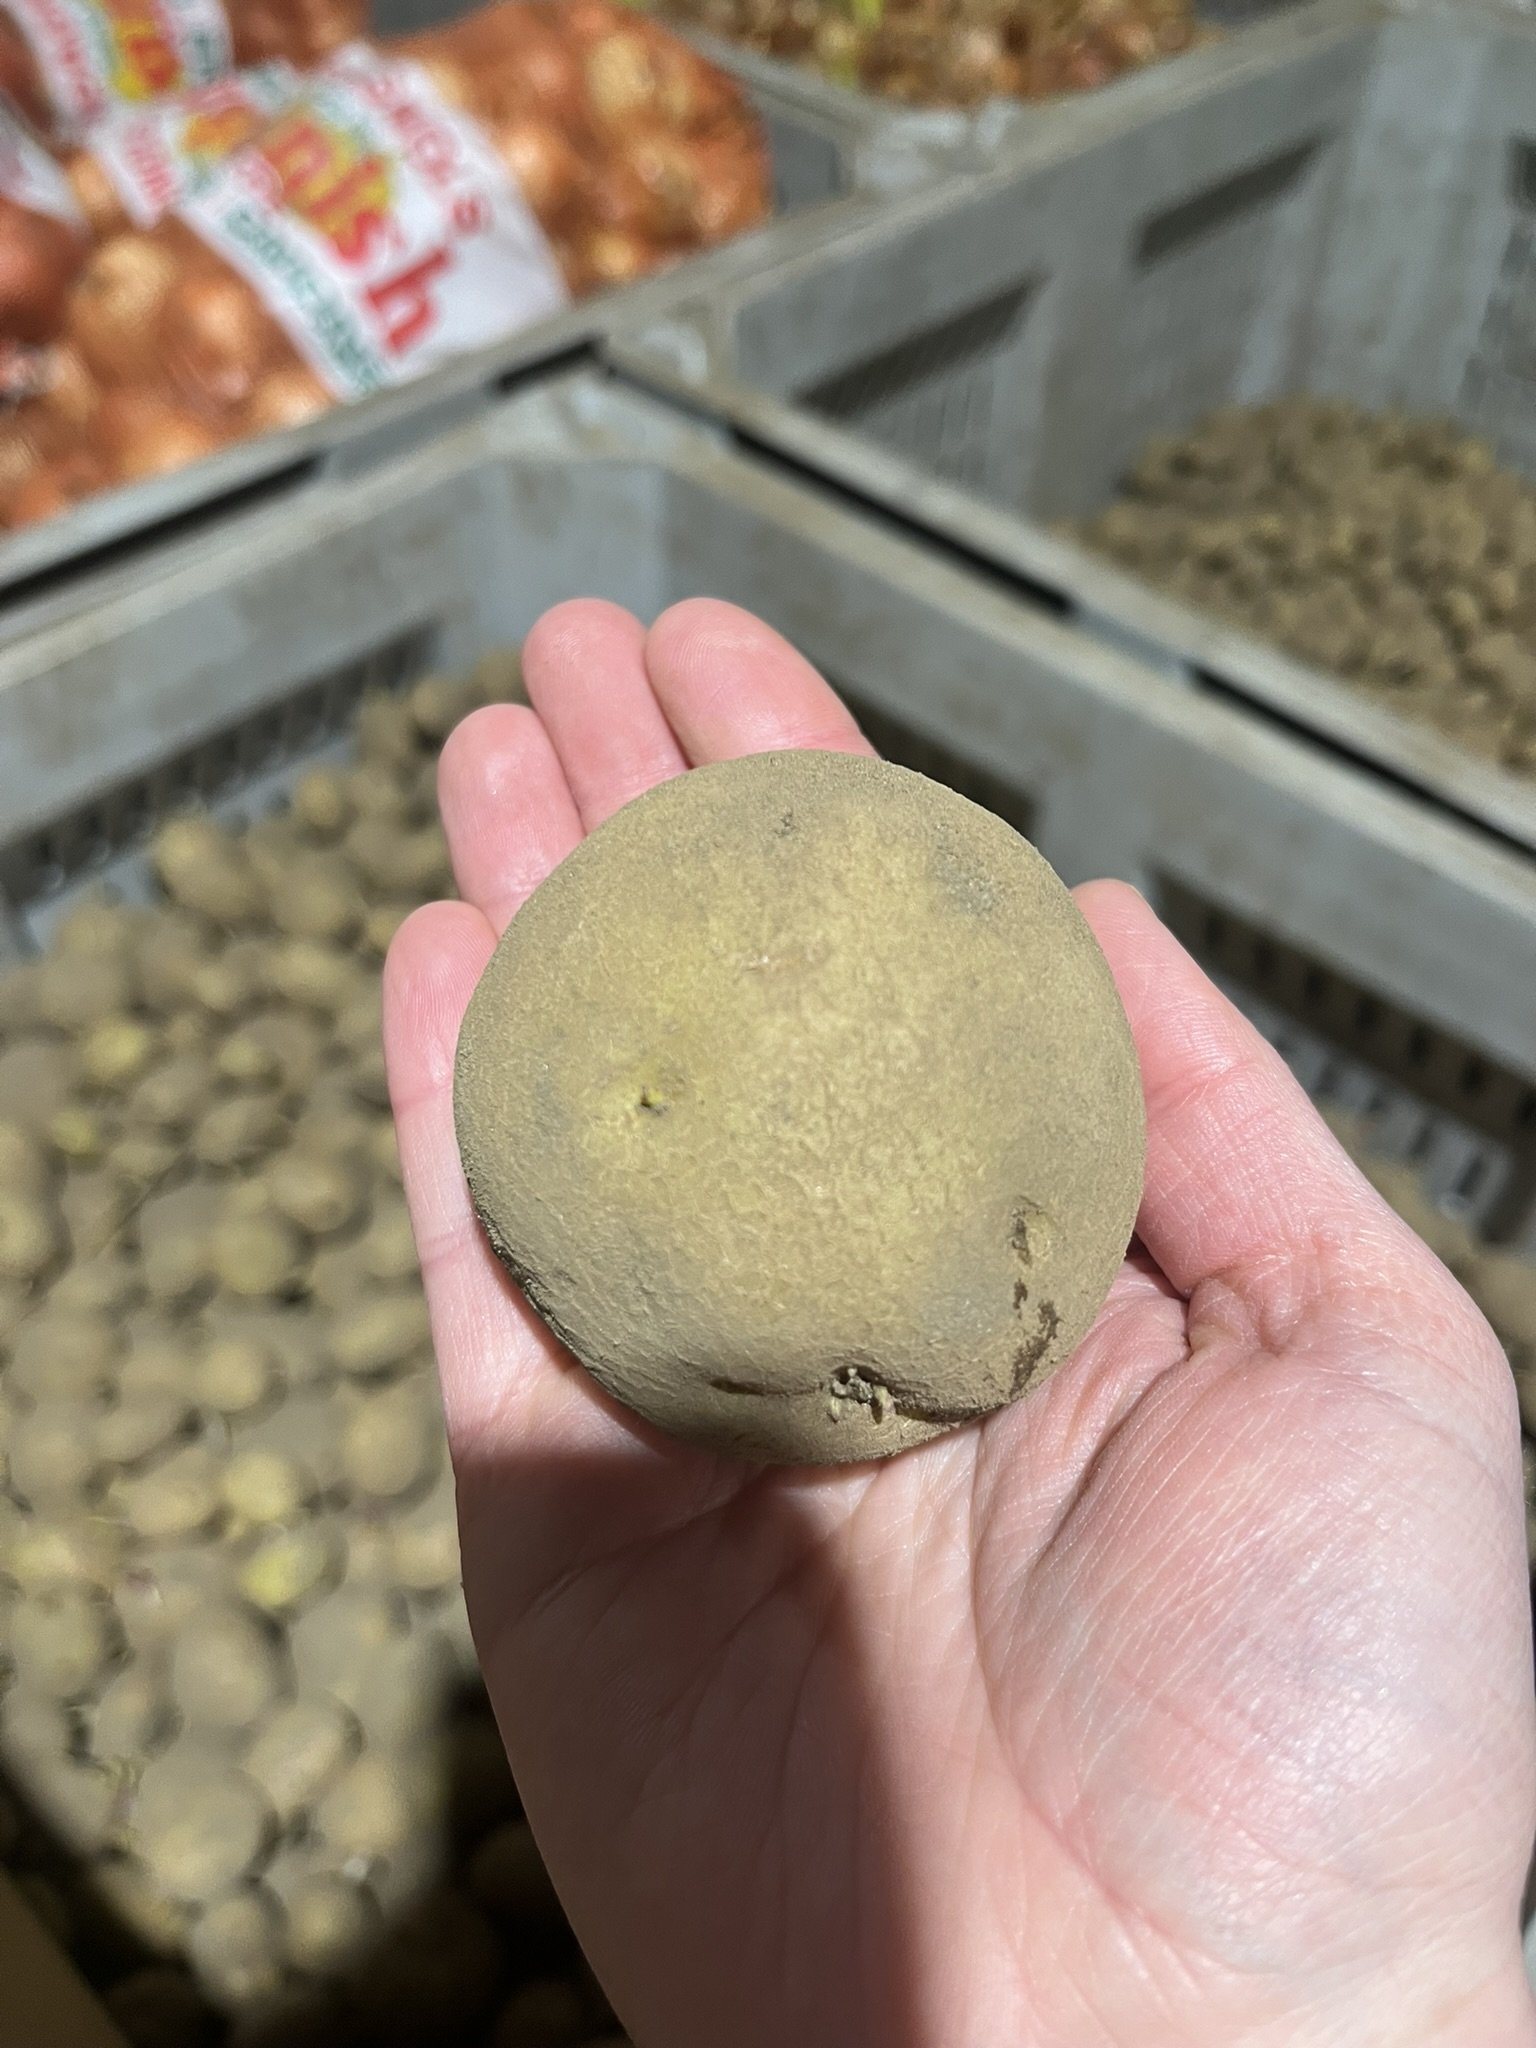
Speaking of overwintered crops, we are delighted to have some onions and potatoes on hand, along with cabbage (not pictured). Once again, these will pair well with our freshly harvested asparagus, rhubarb, greens, and herbs in our May Market Boxes.
2024 On Farm Experiences
As the season start is fast approaching, we wanted to update you on farm experiences for 2024!
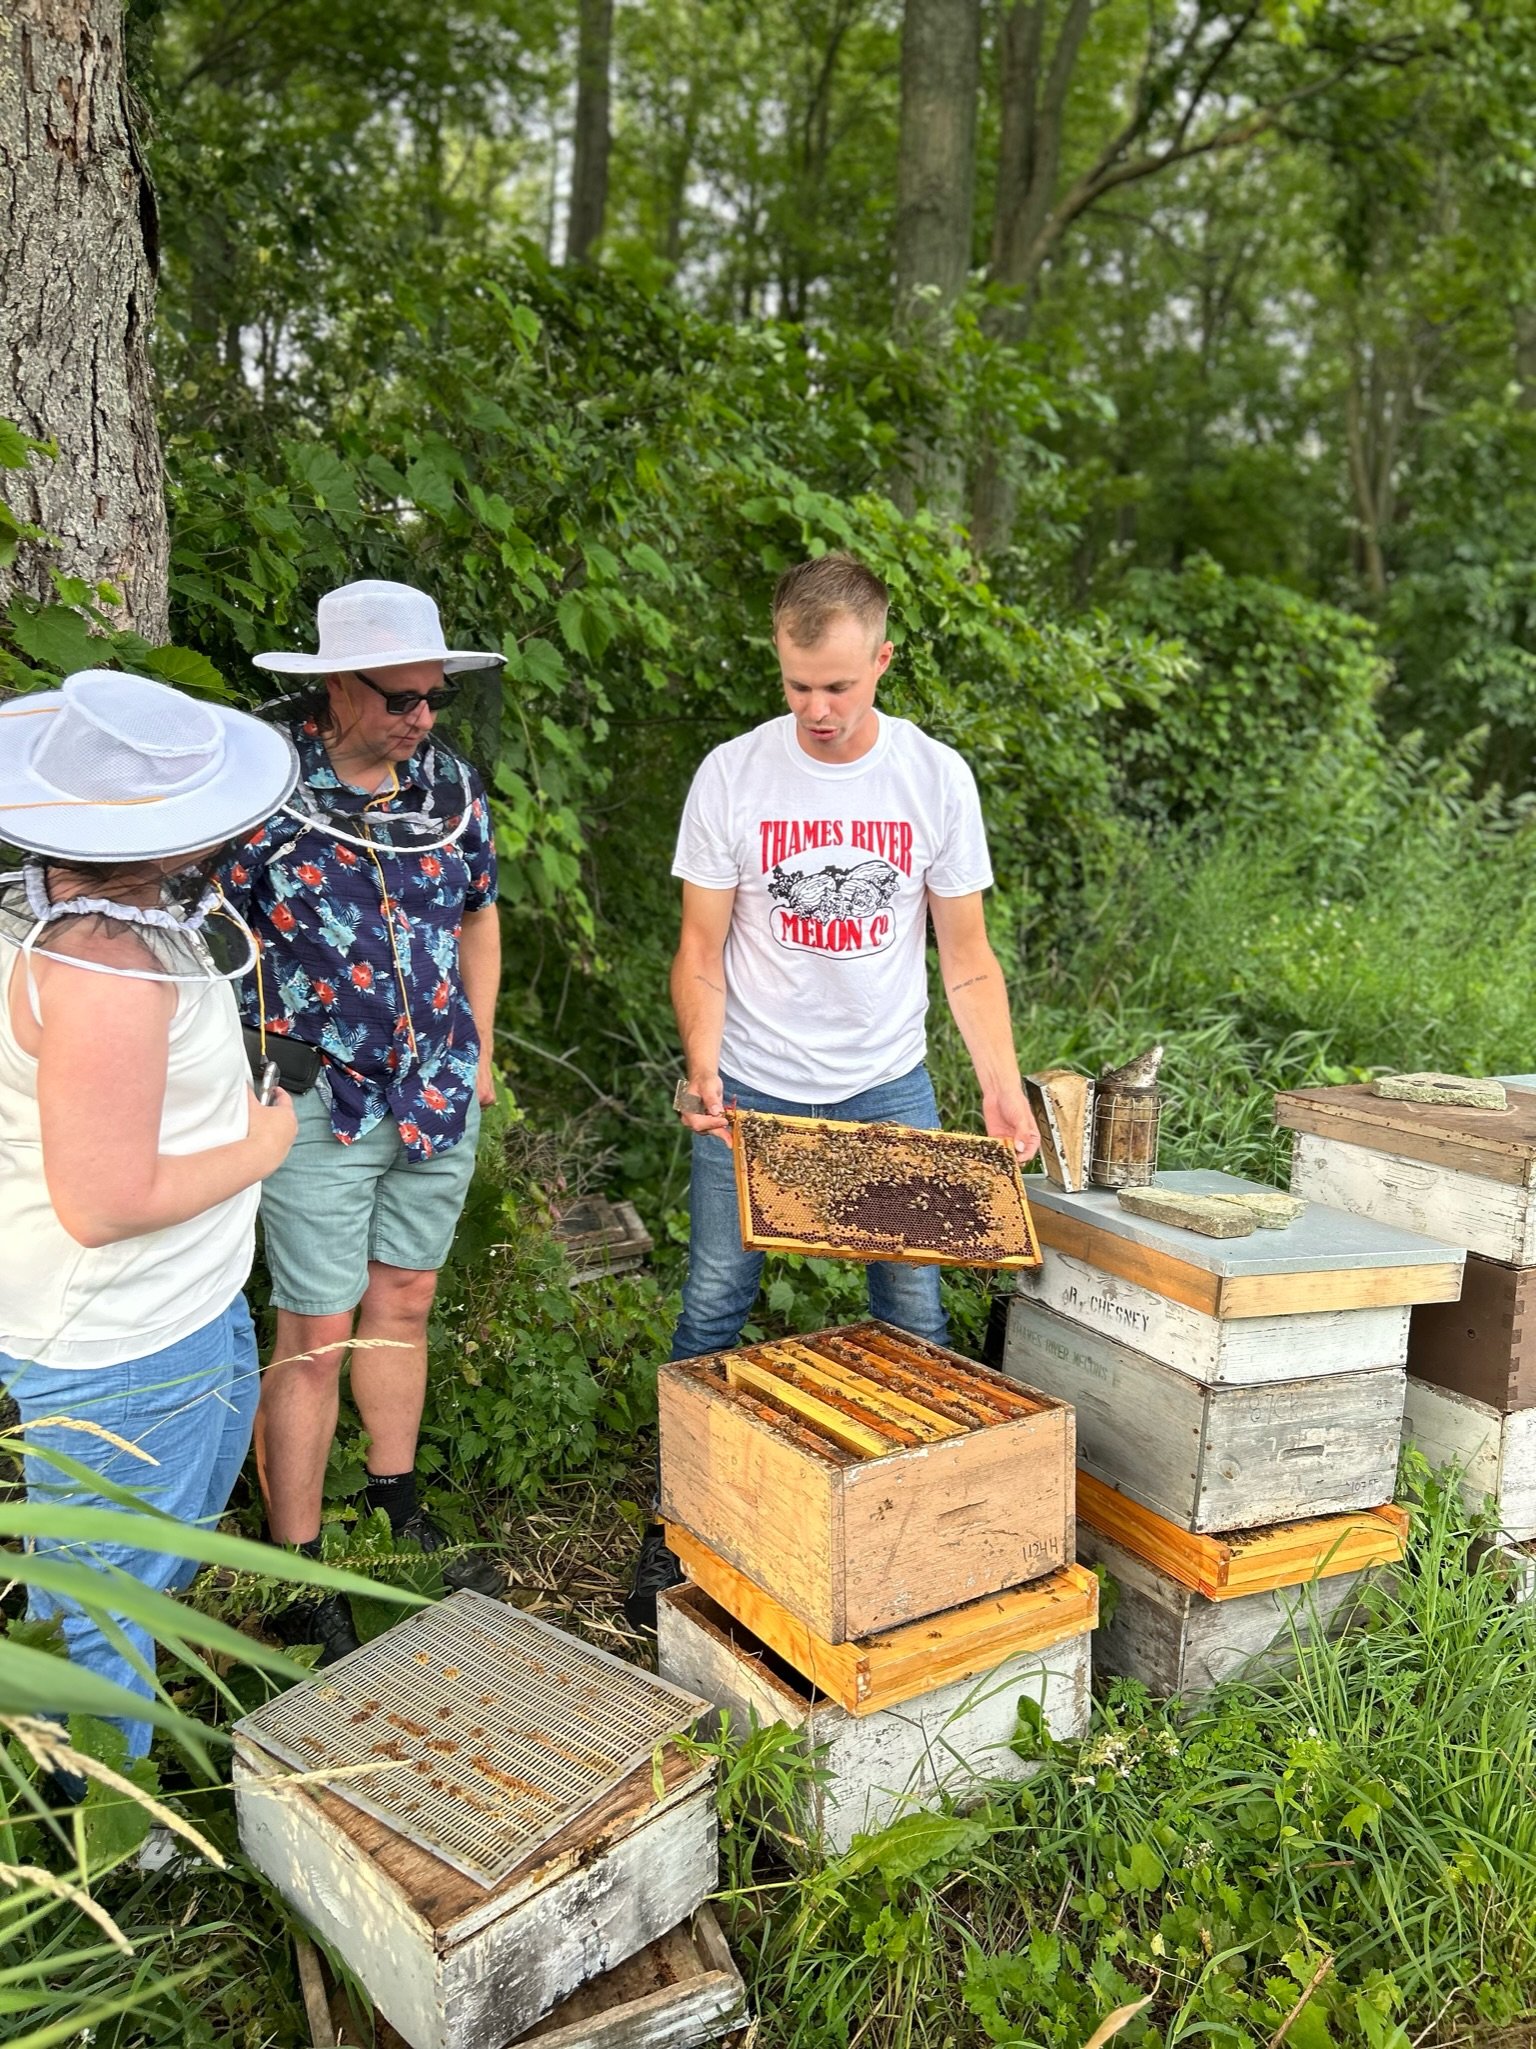
We are thrilled to announce the addition of one brand-new experience: Meet the Bees! Keep reading to learn more.
We are also excited to announce more Harvest Brunch dates, as well as a Pick-Your-Own update.
Meet the Bees

Beekeeping activities will vary depending on weather and season. We’ll provide beekeeping suits, veils, and gloves for you to wear. All ages are welcome!
Keep in mind that while bees are friendly, and we’ll do our best to keep them calm, stings are possible. We have medical supplies available in case of unexpected emergencies, but please don’t sign up if you have had reactions or have a known allergy to bee venom. We will also have a waiver that must be signed upon arrival.
Harvest Brunch
Join Registered Dietitian & Farmer Alex Chesney for some time in the fields at Thames River Melons. Harvest your own fruits and vegetables, visit the chickens, gather eggs, and explore the farm. Slow down and enjoy the beauty of one of Ontario’s most bountiful agricultural areas as you learn more about where your food comes from, how it is grown, the nourishment it offers you, and the benefits of supporting your local producers.
Head back to the brand-new Farm Kitchen where you’ll spend time together creating a beautiful long table brunch crafted around the season’s freshest finds. Cook a delicious & simple frittata and roasted potatoes, learning kitchen tips and tricks as you go and enjoying the company of others. Finally, enjoy the fruits of your labour paired with a selection of other farm goods and local flavours as you sit down together for a social brunch on the farm. Experience how food inspires connection and taste the difference local makes.
In addition to our traditional morning brunches, we will be offering the occasional Harvest Dinner, taking place in the evening. The menu will be adjusted to suit this meal, making it perfect for a date night or a girls night out!

Pick Your Own
Our Farm Market and Pick Your Own (PYO) Patch is set to re-open for the season on Saturday May 4th!
We will start off the year with asparagus & rhubarb (both pre-picked and a limited amount of PYO!) as well as our full lineup of preserves, merch, baked goods, and more.
We are once again participating in Tourism Oxford’s Big Cheese Days event in May 2024 - more details for this will be launching soon, so stay tuned!
Once June rolls around, our PYO strawberries and vegetables will start to be in season. July will bring raspberries and blueberries, and blueberries will continue throughout August and into early September. The veggie patch expands throughout the summer, and lasts all the way into November, so there’s lots of time to harvest your greens, carrots, cauliflower, and more! Finally, once the leaves begin to turn, our Pick Your Own options will transition to include apples and pumpkins.
Keep an eye on our social media channels for PYO Updates, as well as our PYO webpage (linked below!).
If you can’t make it to the farm — we deliver!
Although we would love to welcome you here in person on the farm, we realize that’s not possible for everyone. If that’s the case for you, we may be able to deliver! Check out our map below, as well as a list of delivery options.


Meet us in the Middle

Finally, a happy medium between visiting the farm and receiving a home delivery is a farmers’ market! Market season will slowly begin in May, with more and more markets joining the lineup as our season progresses. Typically all markets are up and running by strawberry season in mid-June!
If you have any other questions, please don’t hesitate to send us an email. We can’t wait to connect with you soon!
Farm and Food Care Partnership
Now, I know I said in our Meet the Family blog post that we’re all pretty camera-shy, and that’s true! However, we did step outside of our comfort zone this past summer when an opportunity to work with with Farm and Food Care arose.
Farm and Food Care is a whole-sector coalition made up of representatives from all farming types and associated businesses, and positions itself as the helpful expert on Ontario agriculture. The common goal is to build public trust in food and farming in Ontario and across Canada. Farm & Food Care Ontario is active in promotion, education, program development and consumer research.
This past summer, Farm and Food Care partnered with Berry Growers of Ontario (aka BGO, an organization that represents - you guessed it - berry growers in Ontario!) to create some videos featuring berry farms. I’m the Chair of BGO and when they were looking for a blueberry farm to film on, I offered up our patch.
Fast forward to July 2023, and a film crew rolled onto the farm. It was quite the experience, but in the end we had a wonderful time sharing and showing off our farm, and the Farm and Food Care team put together a beautiful video. Check it out below!
Meet the Family
Hey there friends of the farm! This is Alex here, reaching out to you from the barn office. We’ve had another taste of winter the a couple of weeks ago, and are now back to some unseasonably warm weather today. Despite all the up and down, one thing remains certain: the season of fresh fruits and veggies will be here before you know it!
While we wait, we thought it may be time for us to reintroduce ourselves. We don’t really do that often around here: we’re a pretty camera-shy bunch, and prefer to hang out behind the scenes most days. But we also know that we frequently refer to ourselves as a family farm, so we thought it was time for you to (electronically, at least!) meet the family.
Family is also top of mind for me right now as my brother Luke is getting married next week! We can’t wait to celebrate with him and his soon-to-be wife Amy, and officially welcome her to the family.

Pictured in the above photo from left to right are Nathan, myself (Alex), Maria, Rob, and Ella. This photo was taken summer of 2023, during a visit from Farm and Food Care. More on that visit later!

Pictured above is Grant, from summer 2021. He’s out on wagon helping with melon harvest!

Pictured above are Luke and Amy, from November 2022. This photo was taken at our Farm Market & Pick Your Own.


Last but not least? Our four-legged family members! The top photo includes our dogs Flagler, Blueberry, and Luna (from left to right), while the bottom features our barn cat Pumpkin.
Who Does What?
Now that you can put faces to names, I’ll fill you in a bit more on everyone’s roles here on the farm. I also asked everyone what their favourite farm fresh food is, so I’m including that too!
Rob is our head farmer, and the reason we’re all here today! He grew up on my grandparents’ tobacco farm, and branched out to growing melons in the early 80s. He is a visionary, the hardest worker you’ll ever meet, and incredibly passionate about growing food and connecting with people. If you’ve ever called the farm, Rob more than likely answered the phone. He oversees all things production, as well as the wholesale side of things.
Rob says he’s anticipating our newly planted peach crop to be fantastic, and therefore his favourite. Peaches will be ready for harvest in 2026!
Maria is an elementary-school teacher (she teaches outdoor education - how perfect is that!), and helps on the farm with a variety of administrative tasks and at the Saturday Stratford Farmers' Market. If you’re ever in the Stratford area, be sure to stop by and say hello to her!
Maria’s favourite farm fresh crop is muskmelon. A classic! She loves to enjoy it by the slice, or cubed up in a bowl.
Grant and Ella are full-time students, and help on the farm on weekends and all summer long with invoicing, filing, farmers' markets, feeding our Black Angus Beef and chickens, and more. Grant is currently in grade 11 and Ella is in grade 9!
Grant’s farm favourite comes from our Farm Kitchen - the soft pretzels! We sell these here on the farm, and they are available for delivery!
Ella’s farm favourite is a Farm Market delight - raspberry frozen yogurt! We serve this up seasonally and it makes for the perfect snack after an afternoon of berry or veggie picking.
Flagler keeps the family entertained with his playful energy and snuggly-sweet nature.
Flagler’s favourite farm treat is fresh raw asparagus!
Alex (it’s me, hi!) works on the farm full-time as a Registered Dietitian and Manager, and oversees farmers' markets, the On-Farm Market (and it’s connected Farm Kitchen & Farm Food Truck!), market box deliveries, marketing (social media/website/blog), recipe development, and staff hiring and training. She loves creating opportunities for experiencing agriculture, whether here on the farm in a Pick Your Own Patch, or via an email newsletter.
My favourite farm flavour is seedless watermelon. I love cubing it up and eating a big bowl as a snack or an addition to lunch. It’s refreshing & delicious, and never gets old!
Nathan is an English professor, and spends his winters writing, researching, and teaching. During the summer months, he oversees our beekeeping activities (we have over 100 hives!), ensuring the ladies are healthy for pollination and extracting honey for sale on the farm. Nathan also manages our food safety program and helps with market box delivery coordination.
m favourites came down to a tie between honey and sweet potato. Bonus if they are served together! Sweet potato casserole, anyone?
Blueberry is the Pick Your Own mascot, and loves meeting new people when they come visit the farm.
Blueberry loves to chomp on carrots and cucumber, and occasionally even eats her namesake — blueberries!
Luke is an e-commerce expert, working on building his company CREO Cards from the ground up. CREO creates custom illustrated, limited-edition, collectible creator merchandise. They work with a wide variety of incredibly talented Artists to create beautiful, hand-drawn representations of iconic moments. Luke frequently lends an ear and offers up advice for our online sales and marketing. He always has the best insights!
Luke’s farm favourite is blueberries. The perfect snack for eating on the go!
Amy works side by side with Luke at CREO, handling all things finance, accounts, and coordination. She is exceptionally organized, and an expert at Excel! She’s our go to for advice on spreadsheets, and also has experience with event planning. Luke and Amy live with their pup Luna in Windsor.
Amy’s favourite comes from the Farm Food Truck: our fresh cut fries! They are hot, deliciously crispy, and perfectly salted. We’ll reopen for the season in May!
Luna’s favourite farm snack is bell pepper. She loves ‘em!


Above left: a photo from our 2023 Long Table Dinner
Above centre: an event in fall 2022, where the whole family helped out!
Above right: Nathan giving a curious customer a peek inside some hives!
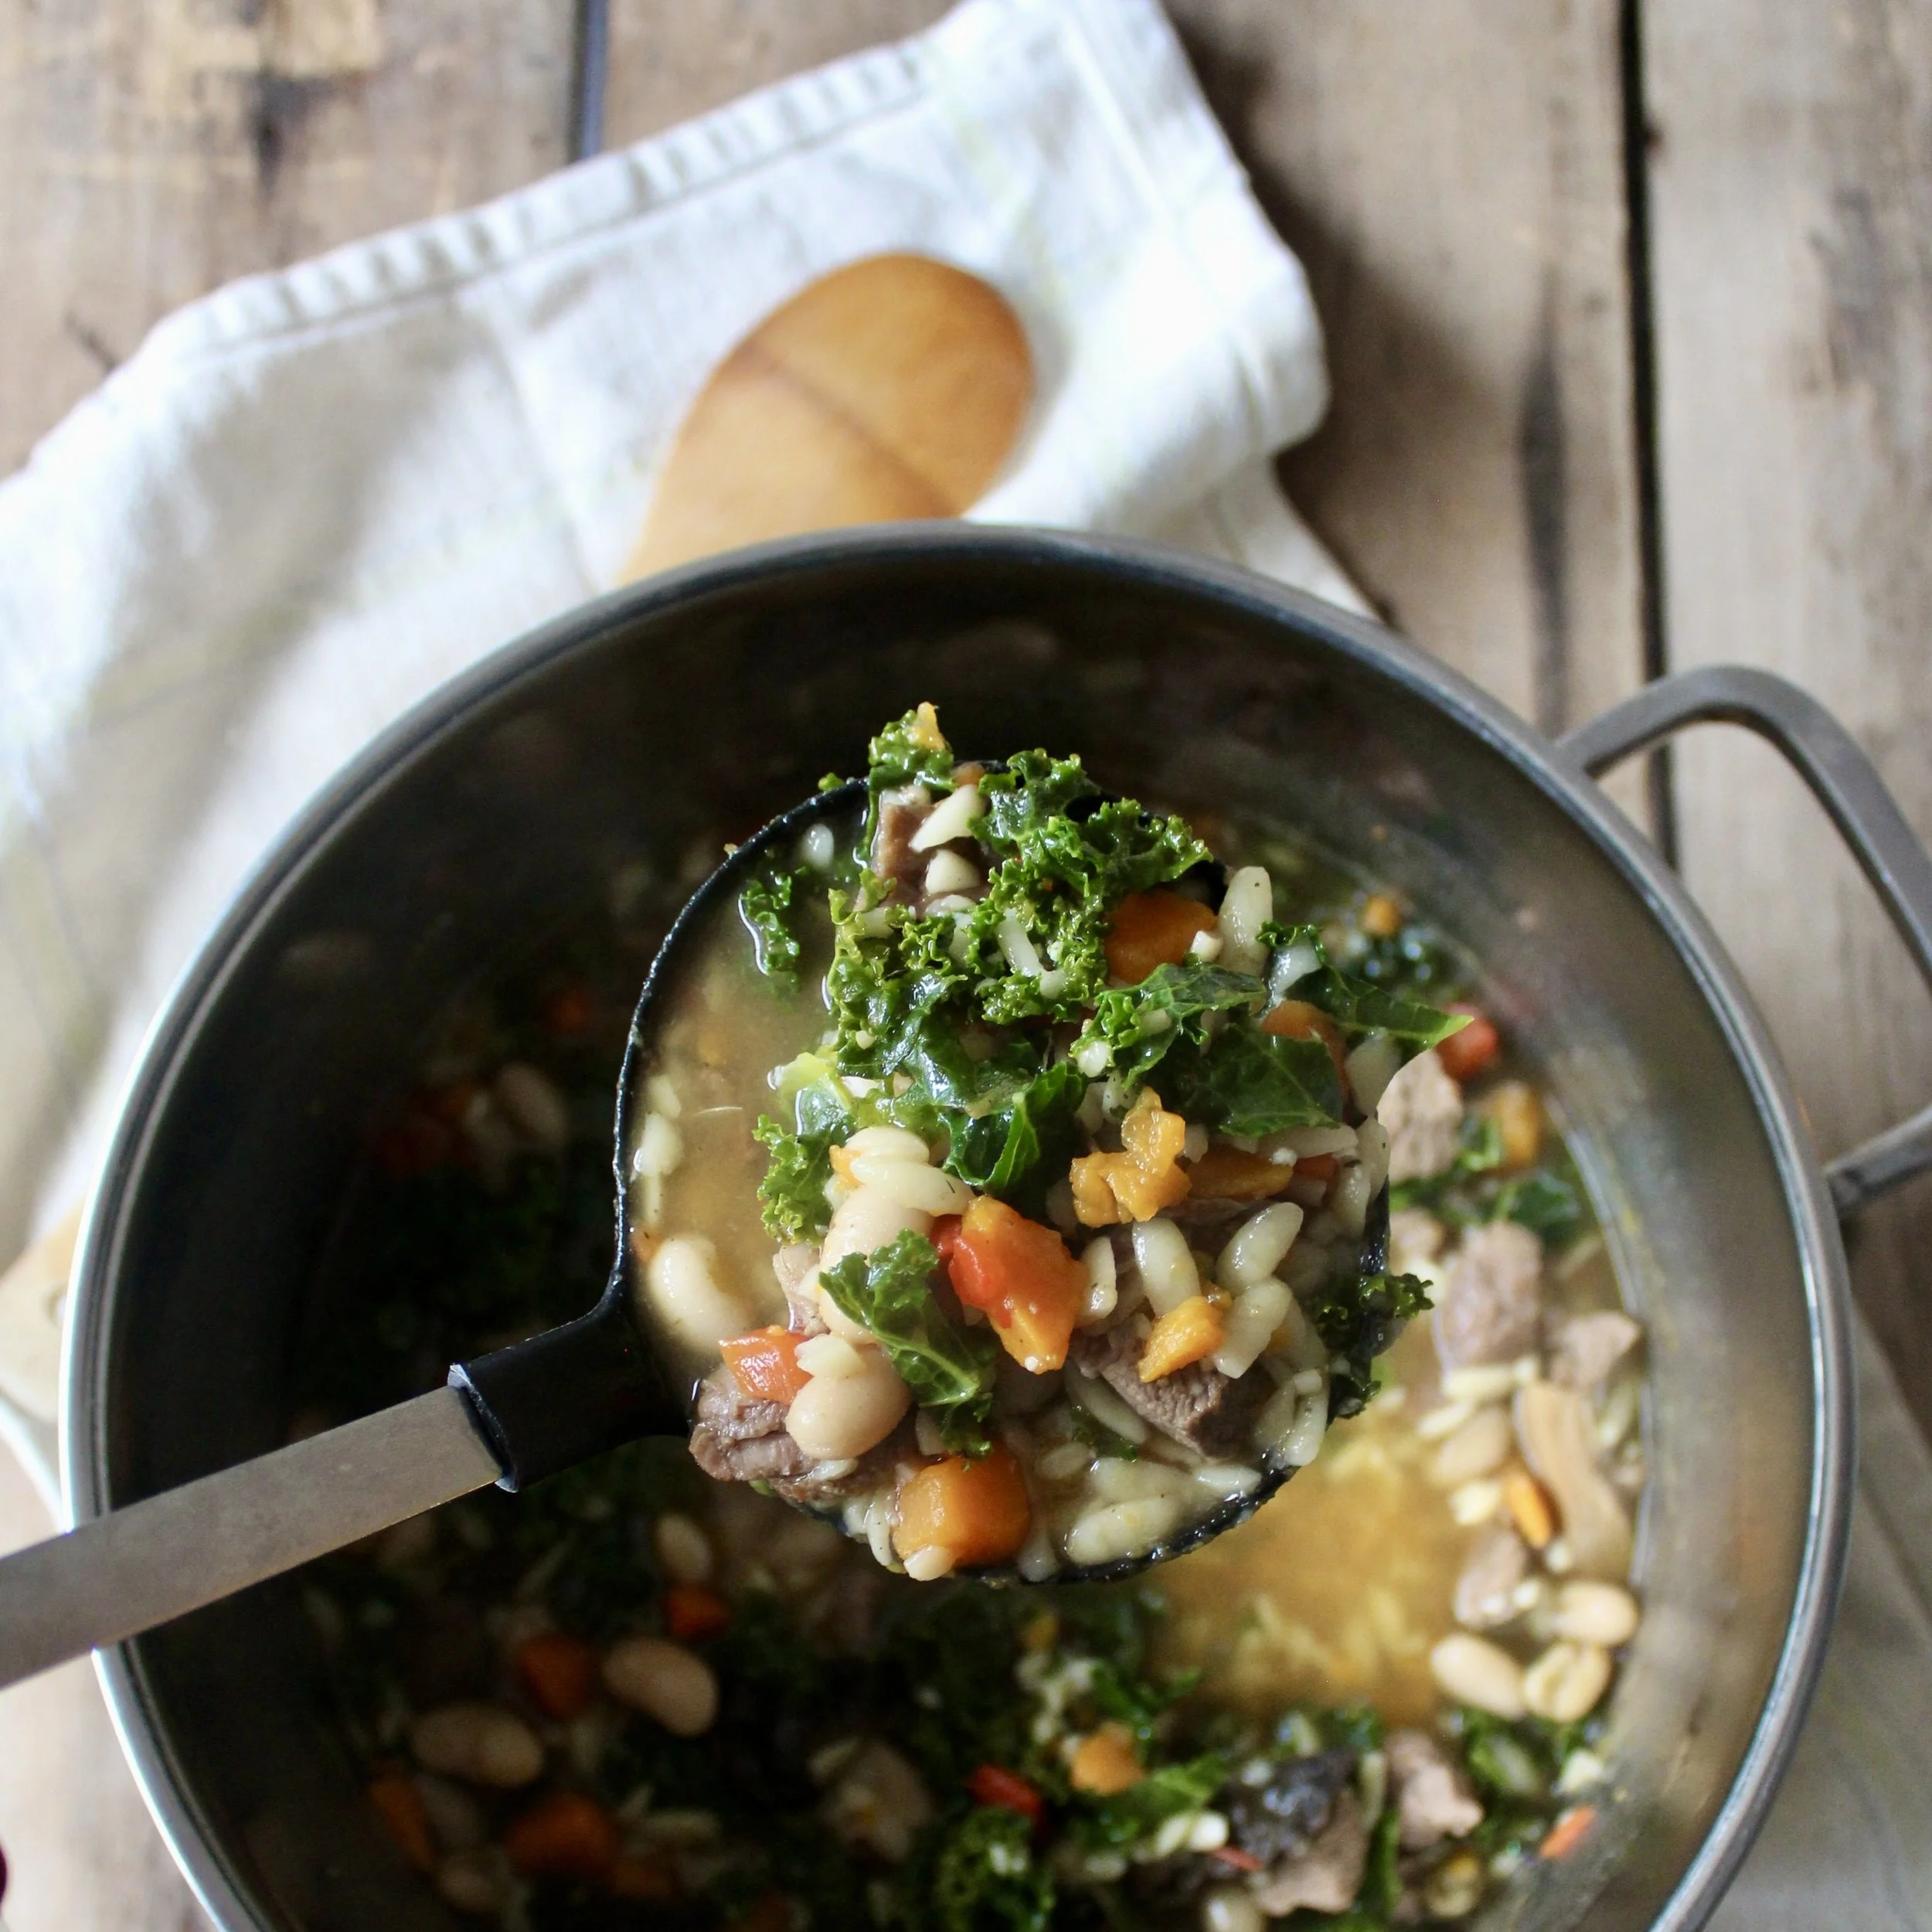
Kale, White Bean, and Beef Stew
Ingredients
1 rib steak, fat trimmed off and cubed
1 tablespoon each cooking oil and butter
½ onion, diced
2 cloves garlic, minced
1 carrot, peeled and diced
1 bell pepper, diced
1 cup mushrooms, washed and sliced
1 teaspoon dried thyme
½ teaspoon red pepper flakes
6 cups beef broth
½ sweet potato, washed, peeled, and diced
1 can white beans, drained and rinsed
½ cup orzo
1 bunch kale, washed and chopped (~2 cups)
Ingredients
Add cooking oil and butter to a large pot and place on the stove over medium heat.
Add cubed rib steak and thoroughly brown on all sides.
Once browned, remove steak from the pot and place in a bowl. Set aside for later use.
Transfer onion, garlic, carrot, bell pepper, and mushrooms to the pot and cook until softened and browned.
Once vegetables are cooked, add thyme and red pepper flakes and stir until thoroughly coated.
Add beef broth, beans, sweet potato, and orzo then bring pot to a boil.
Reduce heat and simmer for 20 minutes, until sweet potato and orzo are fully cooked.
Add kale and cook until softened and wilted.
Serve with crusty bread and slices of your favourite cheese for the perfect cold-weather meal.
Recipe developed and photographed by Alex Chesney, RD


Rhubarb Vinaigrette

Makes ~1.5 cups
Ingredients
1 cup rhubarb, washed, trimmed, and cut into chunks
¼ cup water
2 tablespoons Melon Blossom Honey
2 teaspoons apple cider vinegar
½ teaspoon lemon juice
1 teaspoon Garlic Scape Mustard
¼ cup olive oil
1 clove garlic, minced
Kosher salt to taste
Instructions
Add rhubarb and water to a small pot and cook over medium-low heat until rhubarb is softened and broken down.
Transfer mixture to a cup and blend with an immersion blender. Make sure the cup is wide enough to fit the blender but narrow enough that the blade can be submerged!
Mix remaining ingredients into the blended rhubarb mixture. Serve with your favourite salad, and if you don’t use it all at once store in mason jar for later use. This will keep for up to a week!
Recipe developed and photographed by Alex Chesney, RD
DIY Fruit-on-the-Bottom Yogurt Cups

Ingredients
4 x 250mL jars (old jam jars)
2 cups strawberries, washed and hulled (frozen work too!)
¼ cup water
1 teaspoon vanilla extract
1 tablespoon strawberry jam
2 cups plain yogurt
1 tablespoon sugar
1 teaspoon vanilla extract
Instructions
Add prepared berries and water to a small pot and cook over medium until mixture bubbles and berries are softened.
Stir in 1 teaspoon vanilla and jam and cook for two more minutes.
Let cool completely. While waiting, whisk remaining teaspoon of vanilla into the yogurt along with 1 tablespoon of sugar.
Once berries are cool, evenly distribute into the bottom of the 4 empty jam jars.
Top each jar with ½ cup of yogurt mixture.
Screw tops on jars and store in the fridge. When ready to eat, feel free to add toppings: ground flax, chia seeds, hemp hearts, pumpkin seeds, and more!
Recipe developed and photographed by Alex Chesney, RD
Valentine's Day Recipe Roundup

Are you looking for the perfect sweet treat for your Valentine? Check out this roundup of past recipes for some inspiration! Perfect for if you have some frozen fruit or jam on hand that you’re looking to put to use.
❤️ Strawberry-Rhubarb Turnovers
💗 Vanilla Rhubarb Cheesecake Bars
❤️ Strawberry Coconut Ice Cream
🩷 Vanilla Strawberry Panna Cotta
Cooking with Carrot Tops

Following a trip to the farm for hand-picking carrots, we often overlook one valuable resource right in our kitchen – the carrot tops. These vibrant greens, often discarded, hold the potential to transform into delicious dishes. From soups to pesto to sauteed greens, using carrot tops not only contribute to flavour, nutrition, and creativity but also aligns with minimizing food waste.
Here are three simple carrot top recipes to try:
1. Carrot Top Soup
Ingredients
- 1 bunch of carrots with leaves (carrots coined)
- 1 tablespoon olive oil
- 1 medium yellow onion (diced)
- 4 stalks of celery (sliced)
- 1 tablespoon of garlic (minced)
- 2 dried bay leaves
- 8 cups vegetable stock
- 1 15 ounce can of six bean medley (drained and rinsed)
- Salt and pepper to taste
Instructions
- Cut the carrot root from the stems of the carrots. Wash the root and slice into coins. Cut the carrot greens from the stem and place into a colander or bowl to wash away excess dirt. Set aside to dry (approx. 20 minutes). Once dry, remove remaining hard stems from the carrot leaves.
- Heat olive oil in a large soup pot over medium heat. Add diced onion, celery slices and coined carrots to the pot and cook for approx. 10 minutes (until vegetables begin to soften). Add minced garlic and cook until fragrant and browned, approx. 2 additional minutes.
- Add vegetable broth, six bean medley, and bay leaves to the pot and increase the heat to high. Bring to a boil and then reduce heat to simmer and cook for 35 minutes. Add. salt and pepper to taste.
- After the soup has simmered for 30 minutes, remove from the heat, and stir in carrot greens. Add a dollop of carrot top pesto, if desired.
1. Carrot Top Pesto
Ingredients
- 1 cup carrot leaves
- 1 cup of spinach
- ¼ cup roasted cashews
- 1 tablespoon garlic
- ½ cup olive oil
- ¼ cup grated parmesan
- Salt & pepper to taste
Instructions
- Pulse the carrot tops and spinach leaves, cashews, and garlic in a food processor until coarsely ground. Slowly drizzle in the oil, and process until blended. Add the Parmesan and some salt & pepper, and pulse until combined.
1. Sauteed Carrot Tops
Ingredients
- 4 cups of carrot tops
- 4 tablespoons garlic (minced)
- 3 tablespoons olive oil
- Salt & pepper to taste
Instructions
- Heat olive oil in a medium pan over medium heat. Add garlic and cook for approx. 1-2 minutes, until browned and fragrant. Add the carrot tops and stir continuously until they are covered in oil and have completely wilted, approx. 2-3 minutes. Add salt & pepper to taste.
Tips for using carrot tops effectively
- Wash carrot tops thoroughly before using to remove any dirt or debris
- Store them separately from the carrots in a plastic bag wrapped in a damp paper towel to maintain freshness
- Mix carrot tops with other herbs like parsley or cilantro to create unique flavour profiles
Potato Ham Soup
Servings: 6
Ingredients:
2 tbsp butter
3 cloves garlic, minced
1 white onion, chopped
1 medium sized carrot, chopped
1 celery stalk, chopped
4 white potatoes, chopped to bite sized
½ head of cauliflower, roughly chopped to bite sized pieces
1 ham steak (or about 1 cup ham), chopped
6 cups vegetable stock
¼ cup cream
1 tsp thyme, ground
Salt and pepper to taste
Instructions:
In a large pot, melt the butter. Add the onions, carrots, and celery and saute until tender. Add the garlic and stir for 1 minute.
Add the vegetable stock, and potatoes to the pot. Cook on low-medium heat for about 10 minutes. Add the cauliflower and ham and continue to cook until cauliflower and potatoes are tender.
Add ground thyme, and season with salt and pepper. Remove from heat and stir in cream.
Serve hot.
Note: you can serve this topped with cheddar cheese, bacon bits, a dollop of sour cream, and sliced green onions for added freshness and flavour!

Root Vegetable Sheet Pan Dinner
Sheet pan dinners are super easy and filling! You can omit the protein and use this as a side dish as well. Use any vegetables that you like and that you have on hand. This is a great way to use up those veggies that aren’t looking so fresh, but because we are roasting them, they are perfect for the job!
Ingredients: recommendations only
2 medium carrots, cut into wedges
1/2 onion (red/yellow/white, whatever you have!)
1 parsnip
½ beet, chopped (will change the colour of other vegetables on the pan)
5 mushrooms, cut into quarters
1 head of broccoli
2-3 potatoes (white, red, sweet, whatever you want!)
5-6 Brussels sprouts, halved
5 turkey sausages (if using as a meal)
2-3 generous tablespoons of olive oil or another
1 tsp garlic powder
1 tsp onion powder
½ tsp Italian seasoning
Instructions:
Preheat the oven to 375°F.
Cut up all vegetables and slice turkey sausages. Lay out on a roasting pan.
Cover in oil, and seasonings.
Bake for about 40 minutes, or until potatoes are soft.

Butternut Boursin Sauce

Ingredients
3 cups cubed butternut squash (approximately ½ a squash)
1 block Boursin cheese
½ teaspoon garlic powder
½ teaspoon paprika
½ teaspoon thyme
½ teaspoon onion powder
2 tablespoons canola oil
1 tablespoon balsamic vinegar
½ teaspoon maple syrup
Salt & pepper to taste
½ cup broth
Sage
Instructions
Preheat oven 425°F.
Place butternut squash in a 9 x 13 dish, then add oil, spices, vinegar, and maple syrup.
Season with salt and pepper to taste, then stir to ensure all cubes of squash are coated in oil and the other flavours.
Make a space in the middle of the pan and add the block of Boursin cheese.
Transfer the prepared pan to the preheated oven and bake for 40 minutes, until squash is browned and softened.
Transfer the squash and cheese to a blender or food processor, and blend until smooth.
Loosen up the mixture with broth as desired.
This sauce can be used in lasagna, as a sauce for mac & cheese, or to coat cooked orzo. Or try making a rice casserole with it! The options are pretty endless.
If you want to add a fancy garnish, fry sage leaves in canola oil and place on top.
Recipe developed & photographed by Alex Chesney, RD

Baba Ganoush

Ingredients
2 medium eggplant
2 tablespoons canola oil
2 cloves garlic, roasted or grated
¼ cup tahini
¼ cup canola oil
3 tablespoons lemon juice
¼ teaspoon cumin
¼ teaspoon paprika
¼ teaspoon cayenne pepper
Salt and pepper to taste
Pickled red onions, paprika, and extra canola oil for garnish
Instructions
Preheat oven to 425°F. Line a baking sheet with parchment paper and set aside.
Wash eggplant then slice off the tops (be careful, they can be prickly!) and then slice each one in half.
Brush the eggplant with the 2 tablespoons of canola oil on all sides.
Place the eggplant cut-side down on the prepared baking sheet, then poke holes on the top side.
Transfer the eggplant into the preheated oven, and bake for 30 minutes, until eggplant are wrinkled looking and the side facing the pan is nicely browned.
While the eggplant roasts, prepare the rest of your ingredients: tahini, canola oil, lemon juice, spices, salt, and pepper.
Let the eggplant sit for 10 minutes of so, until cool enough to touch.
Scoop the roasted flesh out, and transfer to a thin tea towel.
Squeeze as much liquid as possible out of the eggplant flesh. You’ll be surprised how much there is! In the end you should get around 1 cup of roasted eggplant, with the excess moisture removed.
Place the drained eggplant into a mixing bowl, and add the remaining ingredients. Use an immersion blender to mix until smooth. Transfer to a serving bowl, and top with pickled onion (optional, but pretty!), a few more pinches of paprika, and extra canola oil.
Serve with cut up veggies and crackers/pita/mini naan bread for dipping.
Enjoy!
Leek & Potato Gratin

Ingredients
Filling
2 leeks, washed thoroughly, cut in half, and sliced into half-rounds
2 tablespoons salted butter
1 teaspoon thyme
1 teaspoon paprika
1 tablespoon all-purpose flour
1 head roasted garlic, cloves removed and puréed*
1 cup milk
½ cup Parmesan cheese
4 – 5 potatoes, washed and thinly sliced
¼ cup milk
Breadcrumb Topping
½ cup breadcrumbs
1 tablespoon Parmesan
1 tablespoon salted butter, melted
Instructions
Preheat the oven to 400°F.
Melt 2 tablespoons of salted butter in a cast iron pan, over medium heat.
Add the washed and sliced leeks and cook until softened and just starting to brown.
Add the thyme and paprika and stir until leeks are coated. Season with salt and pepper to taste (~1/4 teaspoon of each).
Add the pureed roasted garlic and flour and again stir until leeks coated. Roasted garlic may start to stick/burn, so quickly add a bit of milk once leeks are coated. If anything does stick, use a wooden spoon to scrape up any stuck-on bits.
Slowly add the rest of the milk, using a spatula to stir and combine. Once all milk has been added, pour in the Parmesan and again mix until evenly combined. The mixture will be very thick. Taste and season with more salt and pepper as required.
Turn off the heat and remove ¾ of the leek and sauce mixture from the pan. Place in a small pan for use later on. Spread the remaining ¼ of the sauce evenly across the bottom of the pan.
Add a layer of sliced potatoes to the pan, until the bottom is fully covered.
Add ¼ of the mixture back to the pan, and spread out until potatoes are as covered as possible.
Repeat this process two more times. After the final leek mixture has been added, top the pan with the final ¼ cup of milk.
Next, add the breadcrumb mixture to the top of the pan.
To make the bread crumb topping melt 1 tablespoon butter in the microwave. Add the breadcrumbs and Parmesan and stir until evenly combined. Season with salt and pepper to taste.
Spread the breadcrumb mixture evenly overtop of the cast iron pan.
Place the prepared pan into the oven and bake for 40 minutes, until bubbly and potatoes are soft when poked with a fork.
Serve as a side with a protein and vegetable of your choice.
*To make roasted garlic, slice the top off of a whole bulb of garlic, and place on a large piece of tinfoil. Drizzle the garlic bulb with canola oil, and then tightly wrap up the foil. Place in the oven and bake at 425°F for ~45 minutes, until garlic cloves are caramelized and soft, and can be easily squeezed out of their papery outer layer.
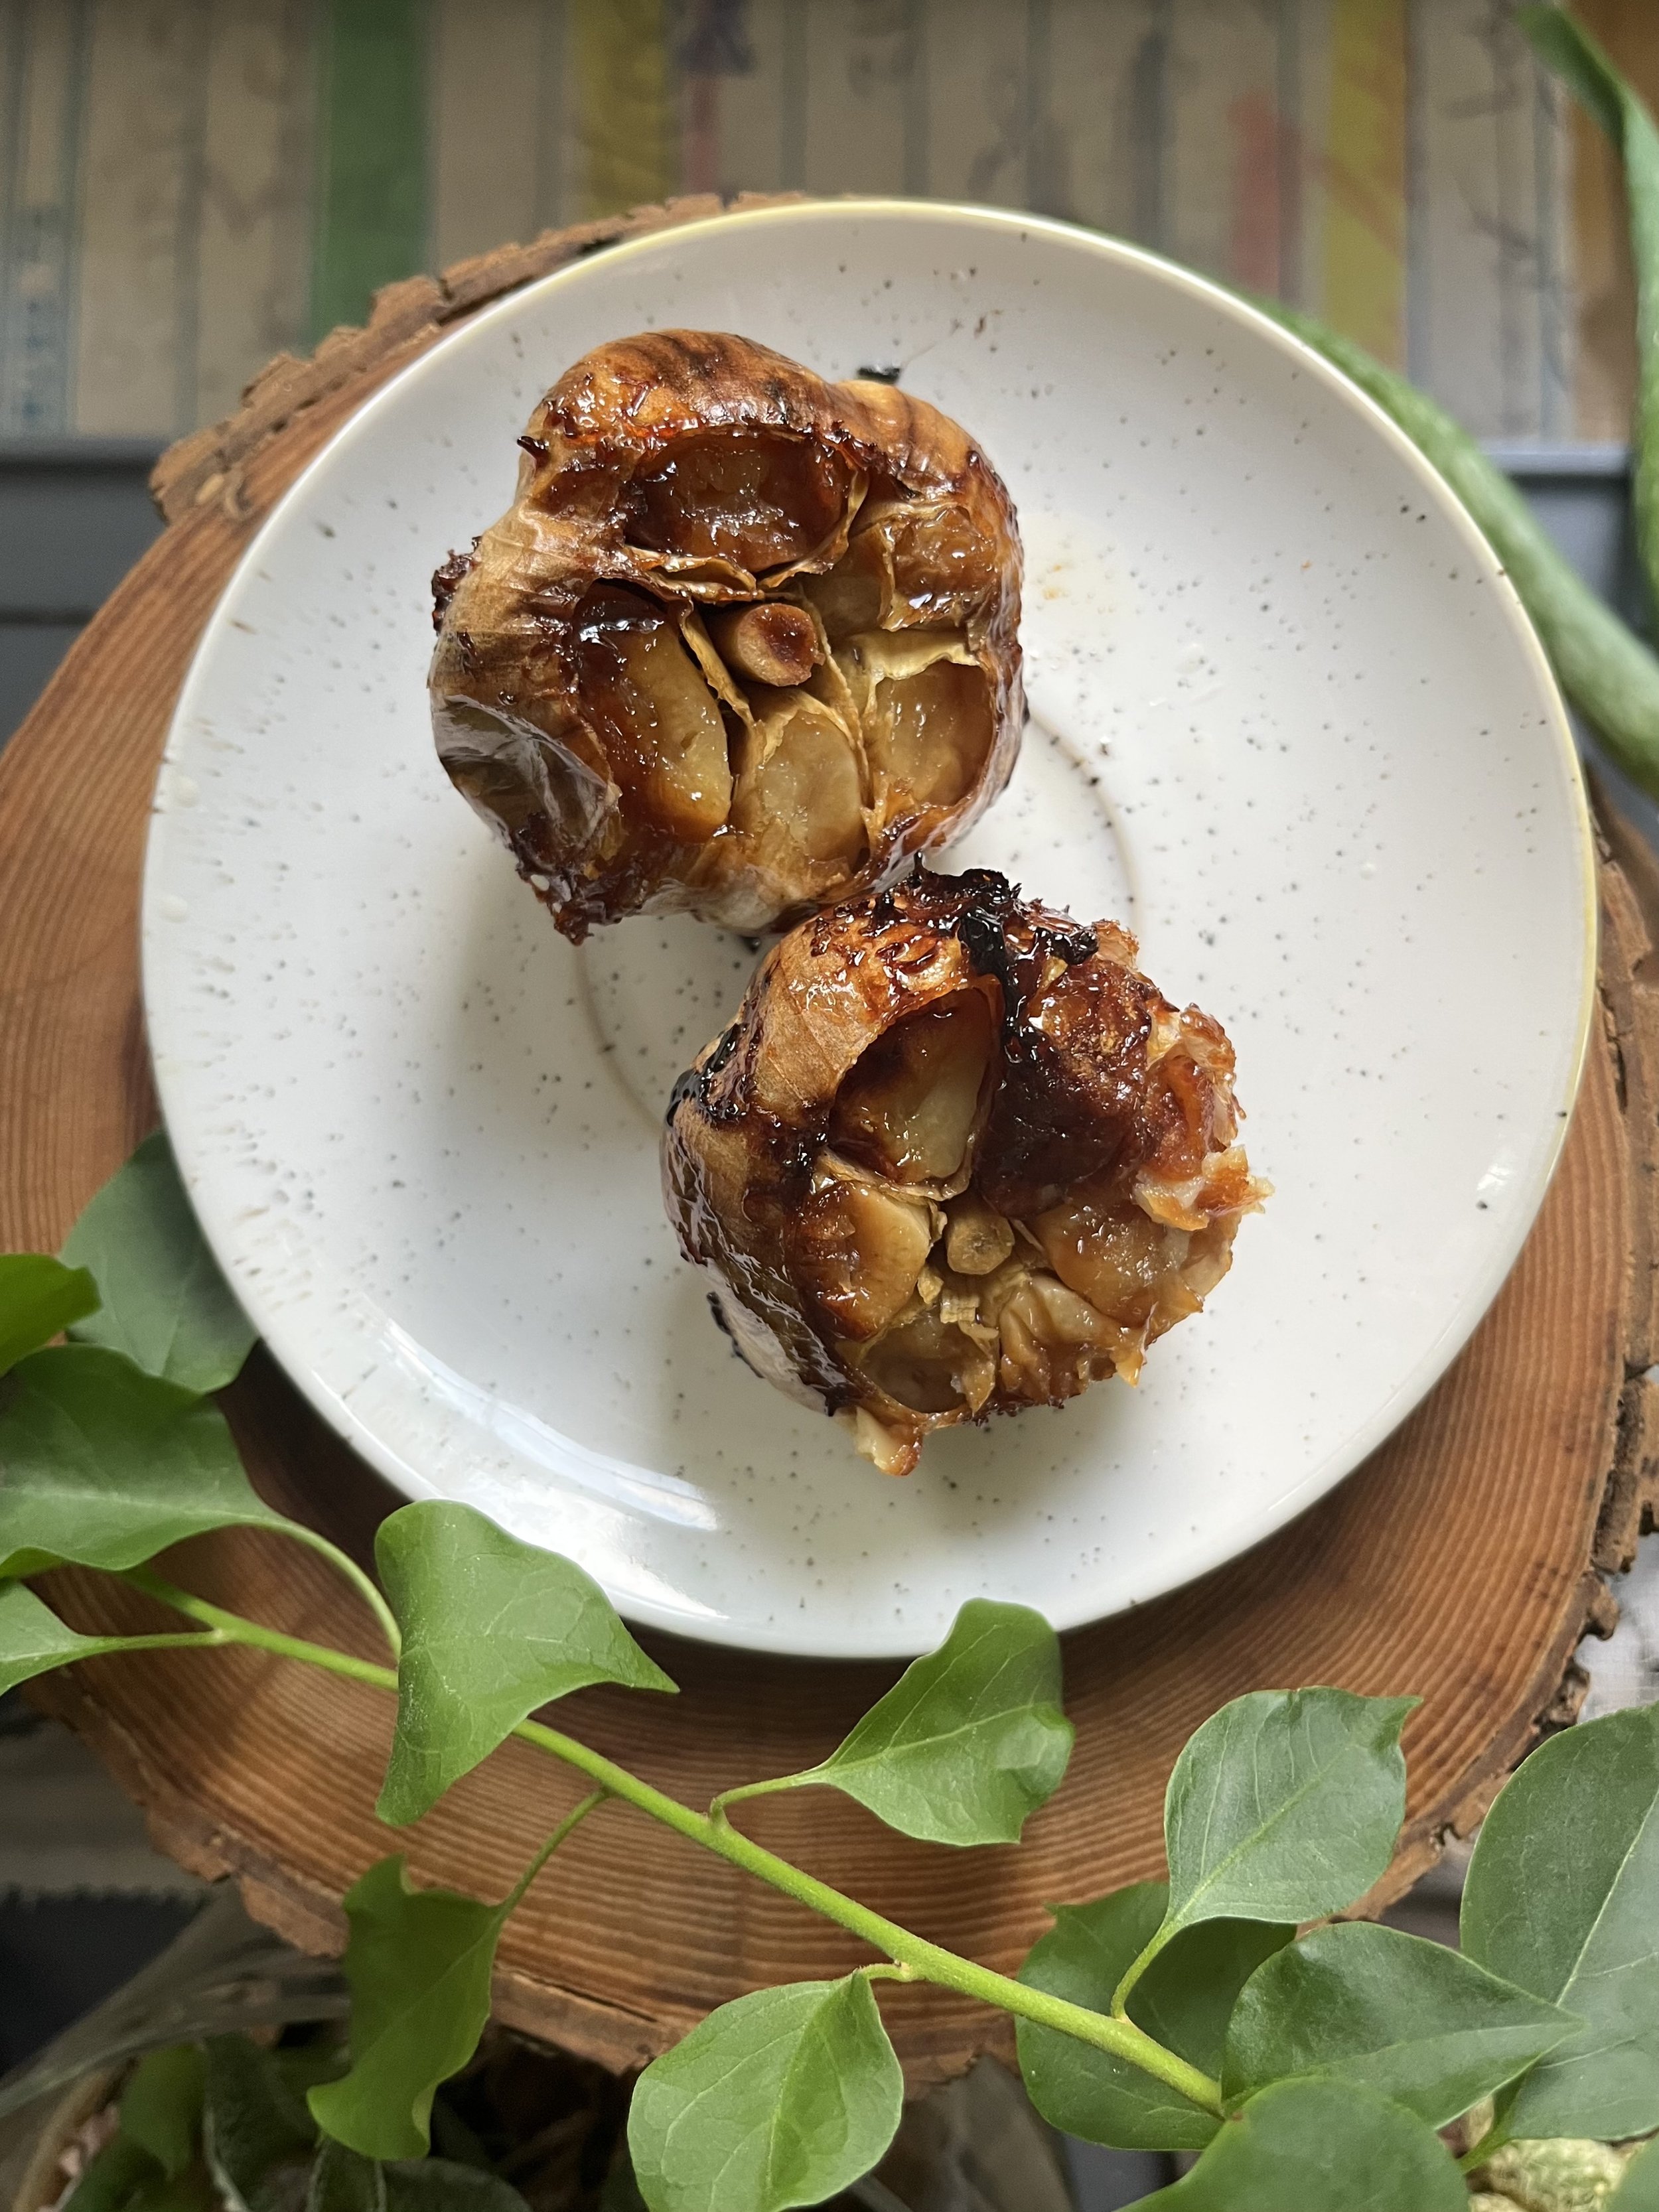
Recipe developed & photographed by Alex Chesney, RD
Marketing Agency
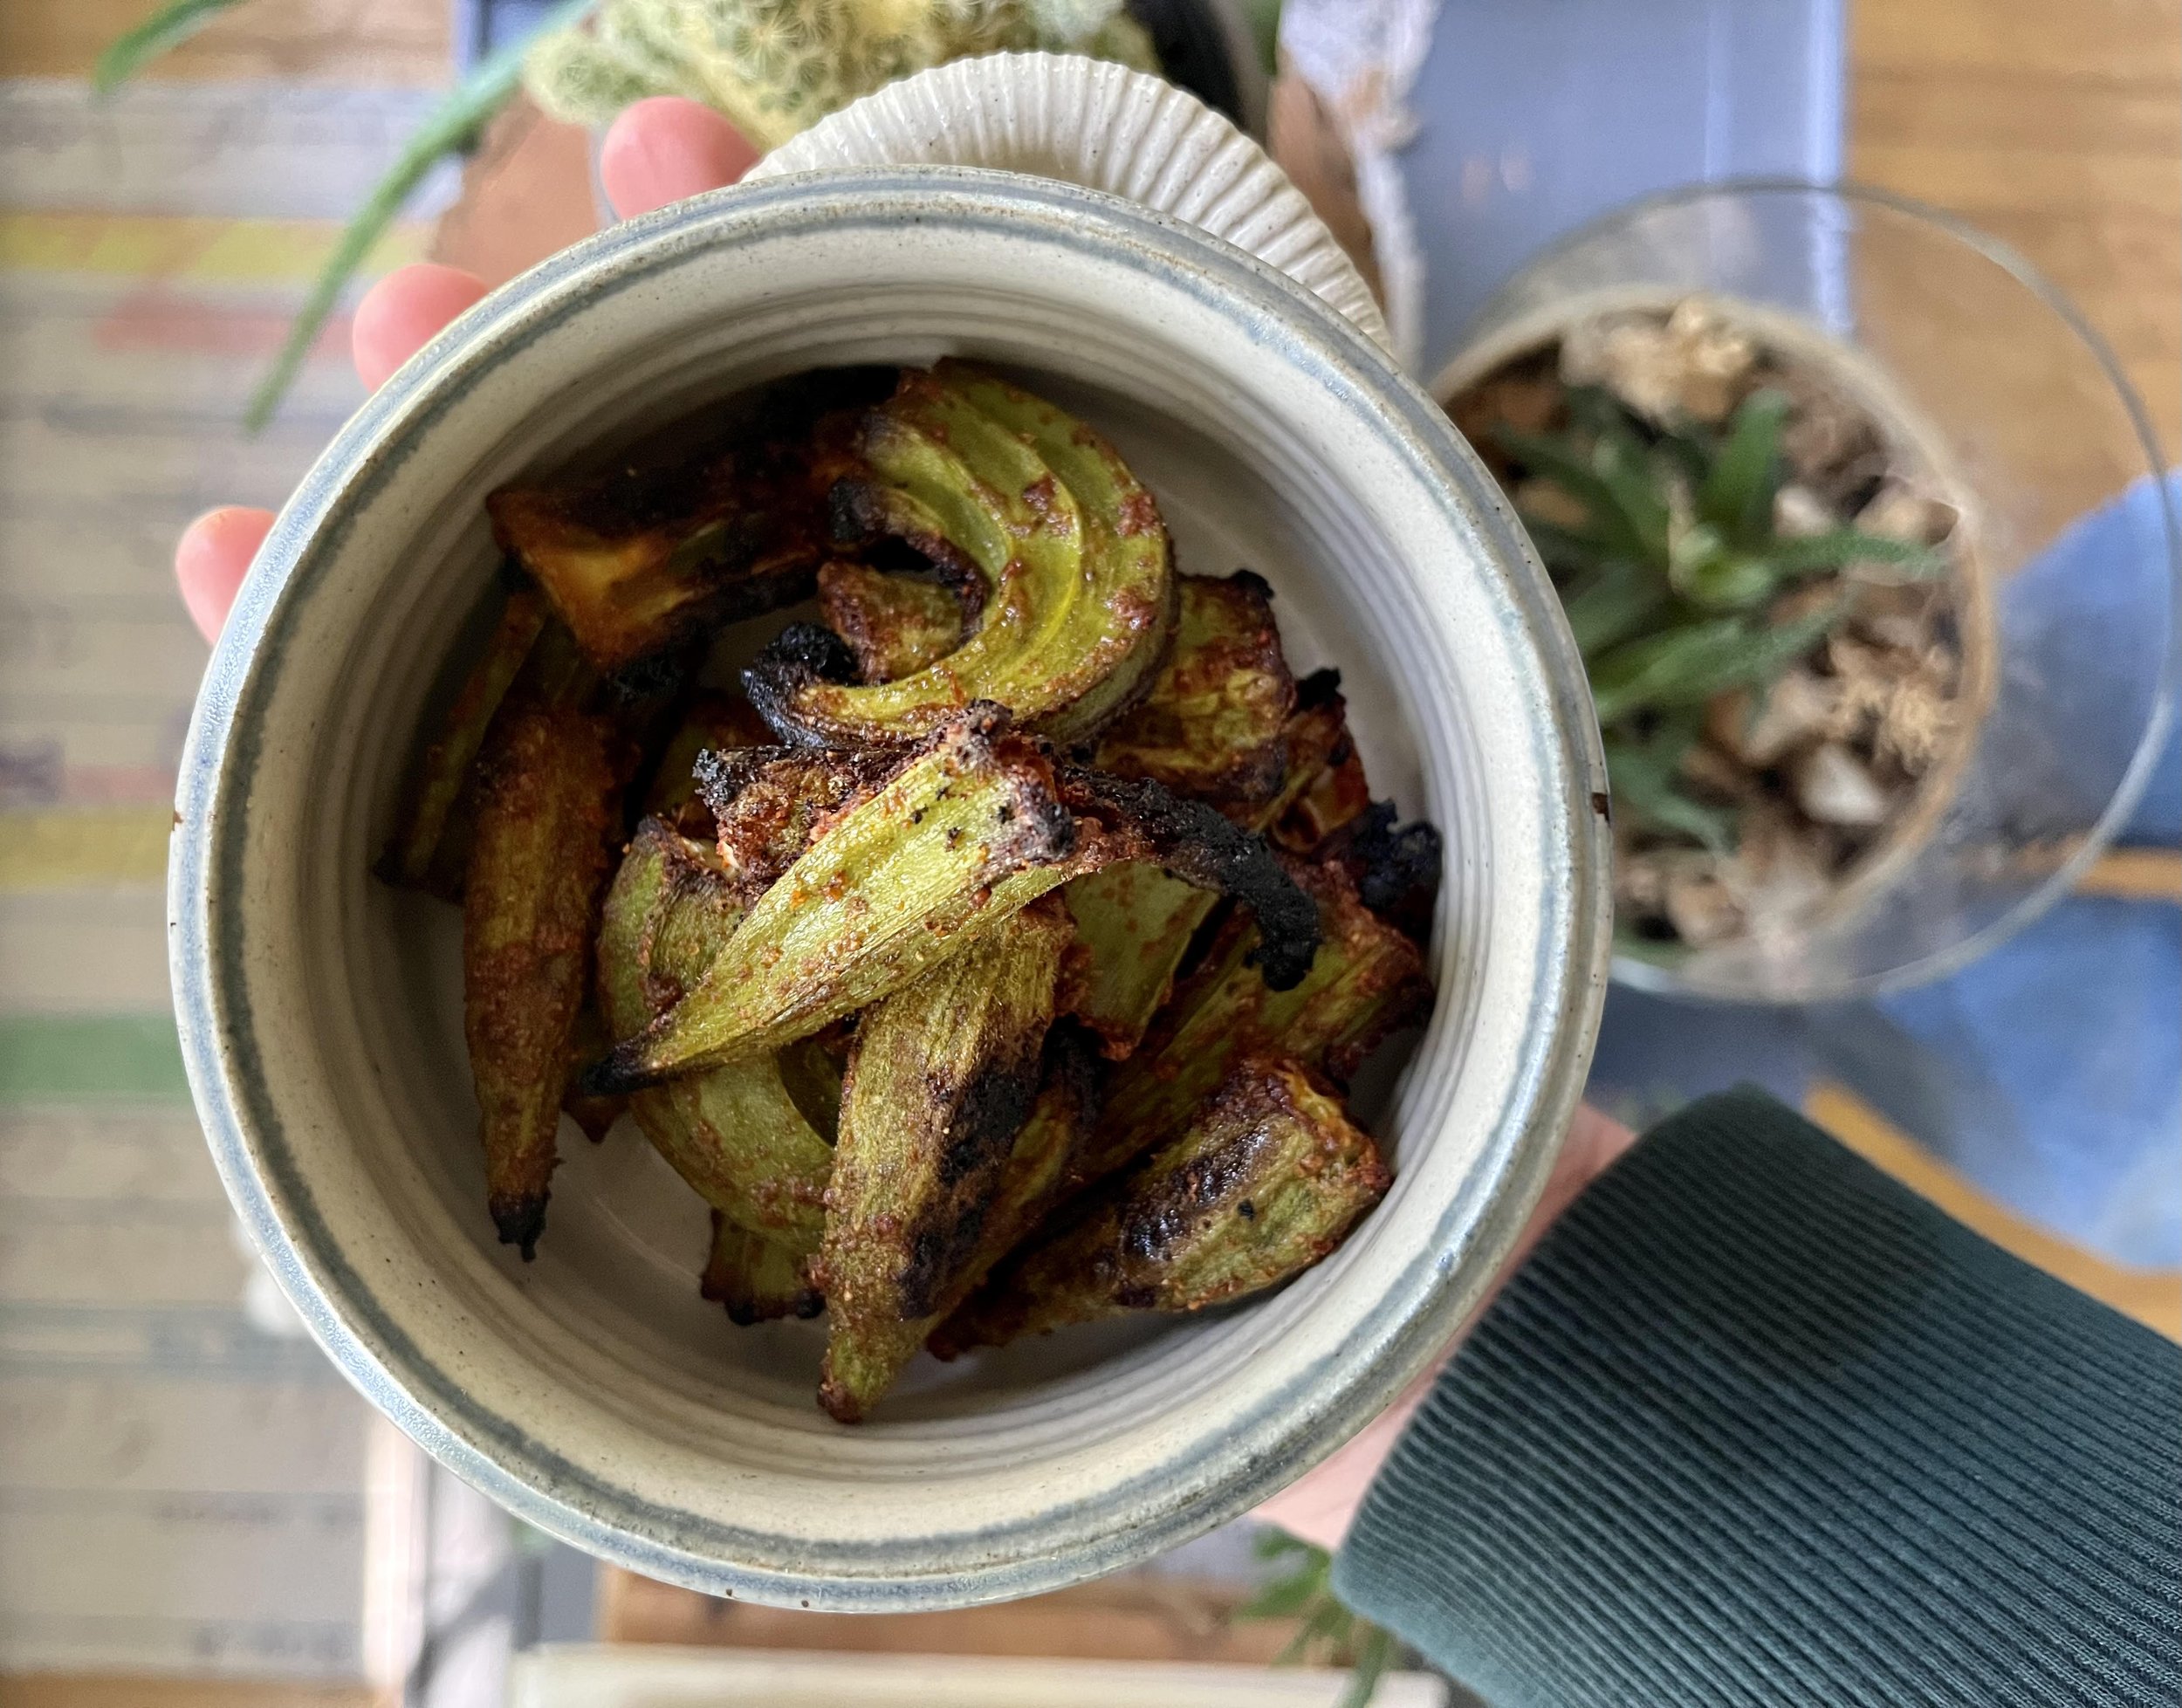
Oven-Charred Okra
Okra is a divisive veggie. It’s unfamiliar to some, and often thought of as slimy for anyone who is aware of it. This super easy oven-roasted recipe is here to help you change your tune, though! They melt-in-your-mouth, and the buttery spices are delicious.
Ingredients
1 quart okra
2 tablespoons salted butter, melted
1 teaspoon paprika
1 teaspoon garlic powder
1/2 teaspoon brown sugar
1/4 teaspoon salt
1/4 teaspoon black pepper
Instructions
Preheat oven to 425°F.
Line a baking sheet with parchment paper and set aside.
Wash okra and cut into 2-inch sections. If some pieces are wider than an inch, slice in half lengthwise.
Transfer washed and prepared okra to a medium mixing bowl and pour over melted butter.
Mix to coat okra, then add spices, sugar, salt, and pepper.
Mix to coat again.
Transfer seasoned pieces of okra to the prepared baking sheet and place in the oven.
Bake for 20 minutes, until okra are softened and starting to appear charred.
Eat as is, or pair with a dip made with Greek yogurt, mayo, and spices of choice. Curry powder and cayenne would be tasty!
Recipe developed & photographed by Alex Chesney, RD
Stuffed & Air-Fried Zucchini Blossoms
Squash blossoms are found in the cuisine of many cultures, such as Italian and Mediterranean dishes. Often referred to as delicacies, they are typically only found at farmers’ markets, so try to get your hands on them while you can!
Stuffed squash/zucchini blossoms may not be familiar to everyone, but they make for a unique appetizer or addition to many dishes. Our suggestion is to be creative and make them your own! That’s exactly how we approached developing the following recipes, grabbing whatever ingredients we had in the garden and trying a number of unique combinations.

Ingredients: Batter
1 cup all-purpose flour
1 cup water, room temperature
Tip: Prepare the batter with oat flour to make the recipe gluten-free/ Celiac-friendly.
Ingredients: Filling
1 block cream cheese
+ additional spices, herbs, fruits and vegetables (5 variations listed below)
Tip: To have softer cream cheese to work with, remove the block from the fridge about two hours prior.

1. Chocolate Strawberry Cheesecake (4 blossoms)
4 large strawberries
1 teaspoon honey
Topping:
1/4 cup semi-sweet chocolate chips, melted
icing sugar

2. Pumpkin Spice Cheesecake (4 blossoms)
1 tablespoon pumpkin spice
1 teaspoon honey

3. Herb & Garlic (4 blossoms)
1 clove garlic, minced
1 tablespoon fresh parsley, chopped
scant ½ teaspoon dried thyme
1 onion slice, chopped
salt & pepper (to taste)

4. Spicy Dill (4 blossoms)
3 tablespoons fresh dill, finely chopped
½ teaspoon red pepper chili flakes
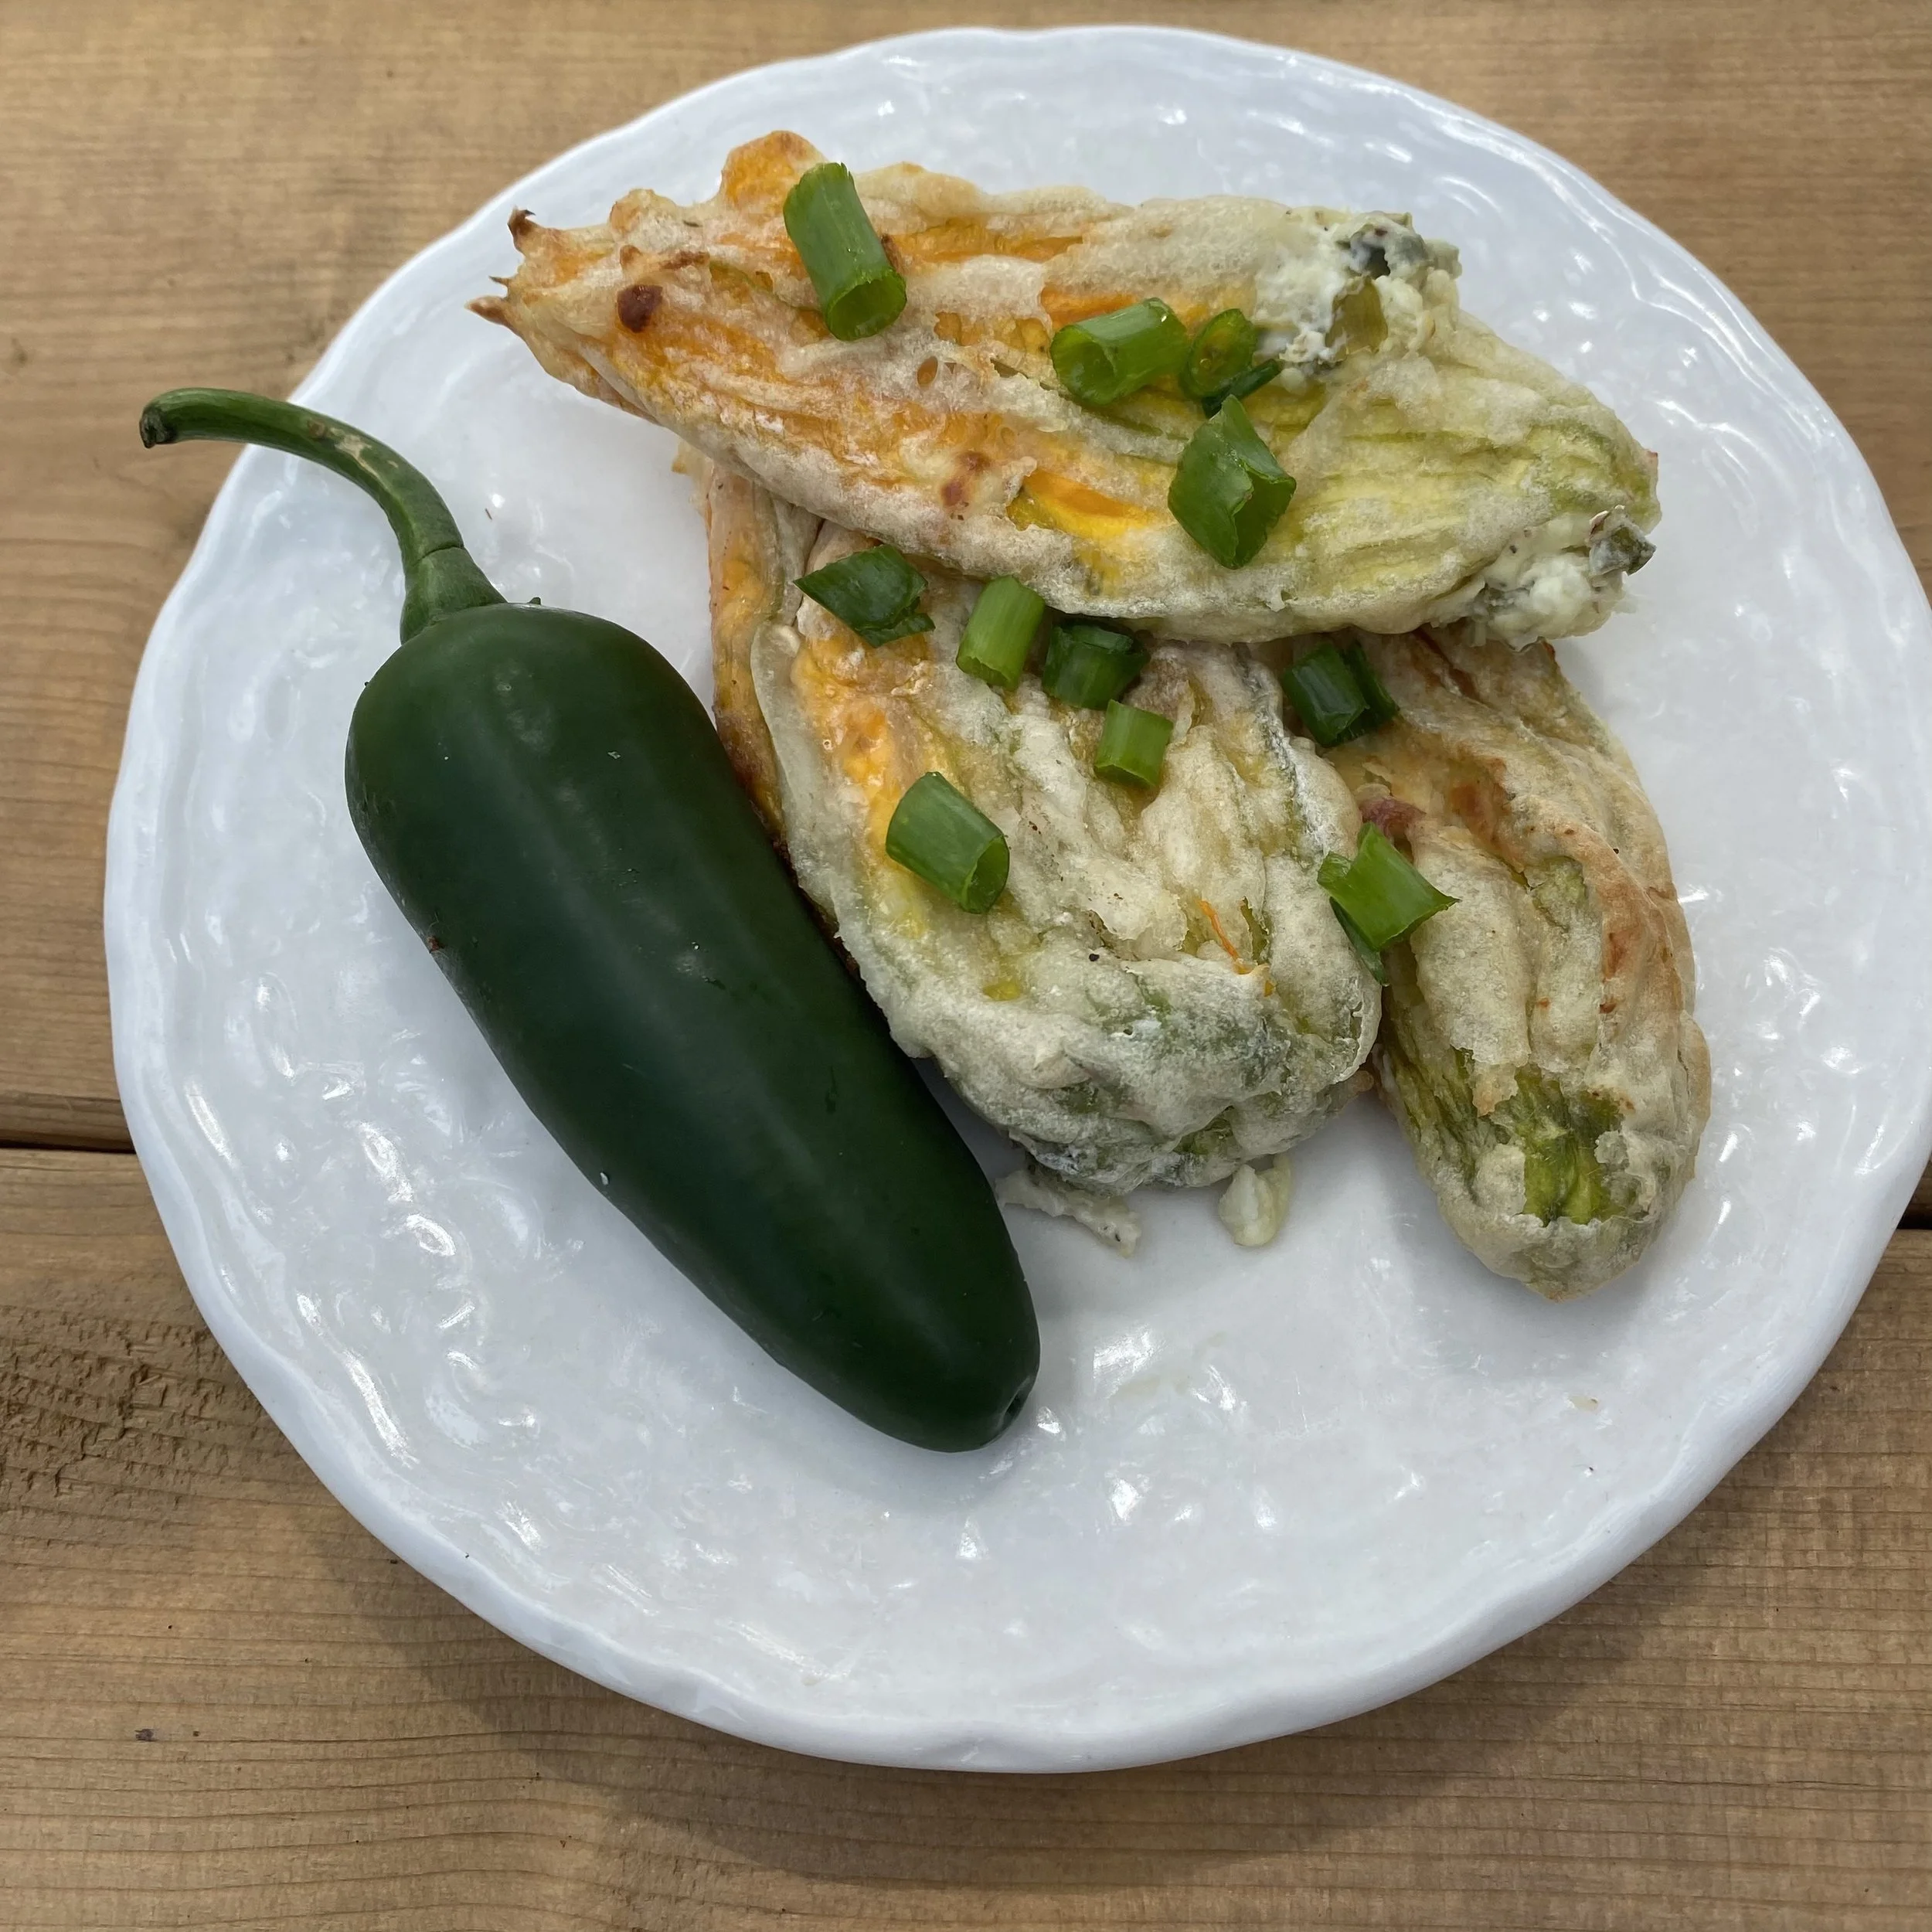
5. Jalapeño (4 blossoms)
2 green onion tops, chopped
1 jalapeño, diced
1 clove garlic, minced
salt & pepper (to taste)
Instructions
Prepare all ingredients according to the suggestions above (e.g., mince, dice, etc.) and set aside.
Gently rinse blossoms with water and dry with a paper towel. It’s okay to open the petals (even if they tear a bit) to ensure there aren’t any bugs. The entire flower is edible, but most people remove the bud from the inside (called the stamen) and the stem from the base of the flower.
In a medium-sized bowl, whisk together the flour and water to create the batter. Set aside for at least 10 minutes.
Preheat air fryer to 370°F.
For each flavour variation, combine all ingredients together in a small bowl and fill each blossom with about 1 ½ tablespoons of the mixture. To make the filling step easier, transfer your filling to a piping bag. If you don’t own one of these, don’t worry! You can make a quick & easy at-home version by filling a Ziploc bag and snipping off one corner.
After the blossoms are filled, carefully coat the outside with batter. Although a bit messy, we found it easiest to do this by hand. Try your best to close the flower so that the filling doesn’t run out when frying.
Evenly coat the air-fryer basket with olive oil and lay down 6 battered blossoms, ensuring they’re evenly spaced. You may be able to fit more depending on the size of your basket.
Fry for 12 min, carefully flipping halfway.
Tip: After frying, if the blossoms are stuck to the bottom of the basket, give them 10 min to cool and they will be easier to remove.
Recipe developed by Alissa Debruyne and Emma Van der Burg, 2023 Dietetic Interns
A Guide to Storing Green Onion
Properly storing green onions can help maintain their freshness, flavor, and texture, allowing you to enjoy their culinary benefits for a longer period. Follow this guide to ensure you store your green onions effectively:
Choose Fresh Green Onions: Visit our pick-your-own patch and select green onions that are firm, crisp, and have vibrant green tops. Avoid ones with wilted, yellowing, or slimy leaves.
Store Unwashed: It's best to store green onions without washing them, as moisture can promote spoilage. If they are dirty, gently wipe off the dirt with a damp cloth or paper towel.
Refrigerator Storage: Store in the refrigerator. There are a few methods to store green onions. These methods help maintain the right level of moisture while providing adequate ventilation.
Method 1:
Place the green onions in a heavy bottomed jar, glass, or vase root-side down. Fill the container of choice with cold or room temperature water, just enough to cover the roots.
Cover the green onions with a plastic Ziploc bag. Clinch the bag slightly around the green onions to store some of the humidity within the bag and zip the bag closed as much as possible.
Transfer the jar to the refrigerator. Replace the water every couple of days.

Method 2:
Alternatively, instead of placing the green onions in a jar, wrap the green onions in a slightly damp paper towel. This provides the humidity needed for proper storage.
Place the wrapped green onions inside a plastic Ziploc bag or storage container; it does not need to be sealed airtight. Remoisten the paper towel if it becomes too dry or too wet.

Utilize Quickly: While green onions can be stored, they are best used fresh for maximum flavor and texture. Try to use them within 1-2 weeks of purchasing.
Freezing Green Onions: You may also choose to freeze them for later use. Chop the green tops and white bulbs separately, spread them on a baking sheet to freeze individually, and then transfer them to an airtight container or Ziploc freezer bag. Frozen green onions are best used in cooked dishes rather than fresh ones due to the change in texture.
The jar or damp paper towel methods are great for storing various herbs that have delicate leaves and stems. Try these methods with other herbs as well!
Parsley
Cilantro
Basil
Mint
Dill
Chives
Oregano
Thyme
Rosemary
Sage
Whole Roasted Cauliflower

Ingredients
1 head cauliflower
3/4 cup canola oil
3 tablespoons lemon juice
1 1/2 teaspoon maple syrup
1 1/2 teaspoon paprika
1 1/2 teaspoon thyme
1 1/2 teaspoon nutritional yeast
2 cloves garlic, minced
3/4 teaspoon salt
3/4 teaspoon pepper
1/2 teaspoon red pepper flakes
Instructions
Trim leaves off of cauliflower and cut stem down as low as possible, while still keeping the cauliflower head intact.
Wash the cauliflower head and shake off to remove excess water, then place on a tea towel to dry further.
Preheat the oven to 400°F.
While the cauliflower dries, whisk together the marinade/sauce.
Add oil, lemon juice, and maple syrup to a small bowl and whisk vigorously to combine. Add herbs and seasonings and whisk again.
Flip the head of cauliflower upside down in a cast iron pan and pour half of the oil and spice mixture into the crevices.
Flip the cauliflower back right-side-up and place in the cast iron pan. Use a pastry brush to spread the rest of the oil mixture all over the cauliflower.
Tightly cover the cauliflower and pan with a large piece of tin foil (spray it with cooking spray to prevent any sticking!) and transfer the pan to the preheated oven.
Bake for 1 hour, removing the tin foil when 10 minutes remain on the timer.
Remove from the oven and slice into large pieces, and display on a serving tray. Top with a sauce of your choice (if desired), and some crumbled cheese or sesame seeds.
Recipe developed & photographed by Alex Chesney, RD
Oven-Roasted Grape Tomatoes

Ingredients
1 pint grape tomatoes
2 tablespoons olive oil
1/4 teaspoon salt
1/4 teaspoon pepper
1/8 teaspoon red pepper flakes
1/8 teaspoon garlic powder (or 1 clove freshly minced garlic)
Instructions
Preheat the oven to 425°F.
Thoroughly wash your grape tomatoes, then transfer them to an oven-safe dish.
Drizzle with olive oil and stir to coat.
Sprinkle all herbs and seasonings and again stir to coat.
Transfer the baking pan to the pre-heated oven and roast for a total of 40 minutes, until juices are evaporated and tomatoes are wrinkled-looking and shrunken down.
Stir the tomatoes about halfway through, to help them cook evenly and to prevent them from burning/sticking.
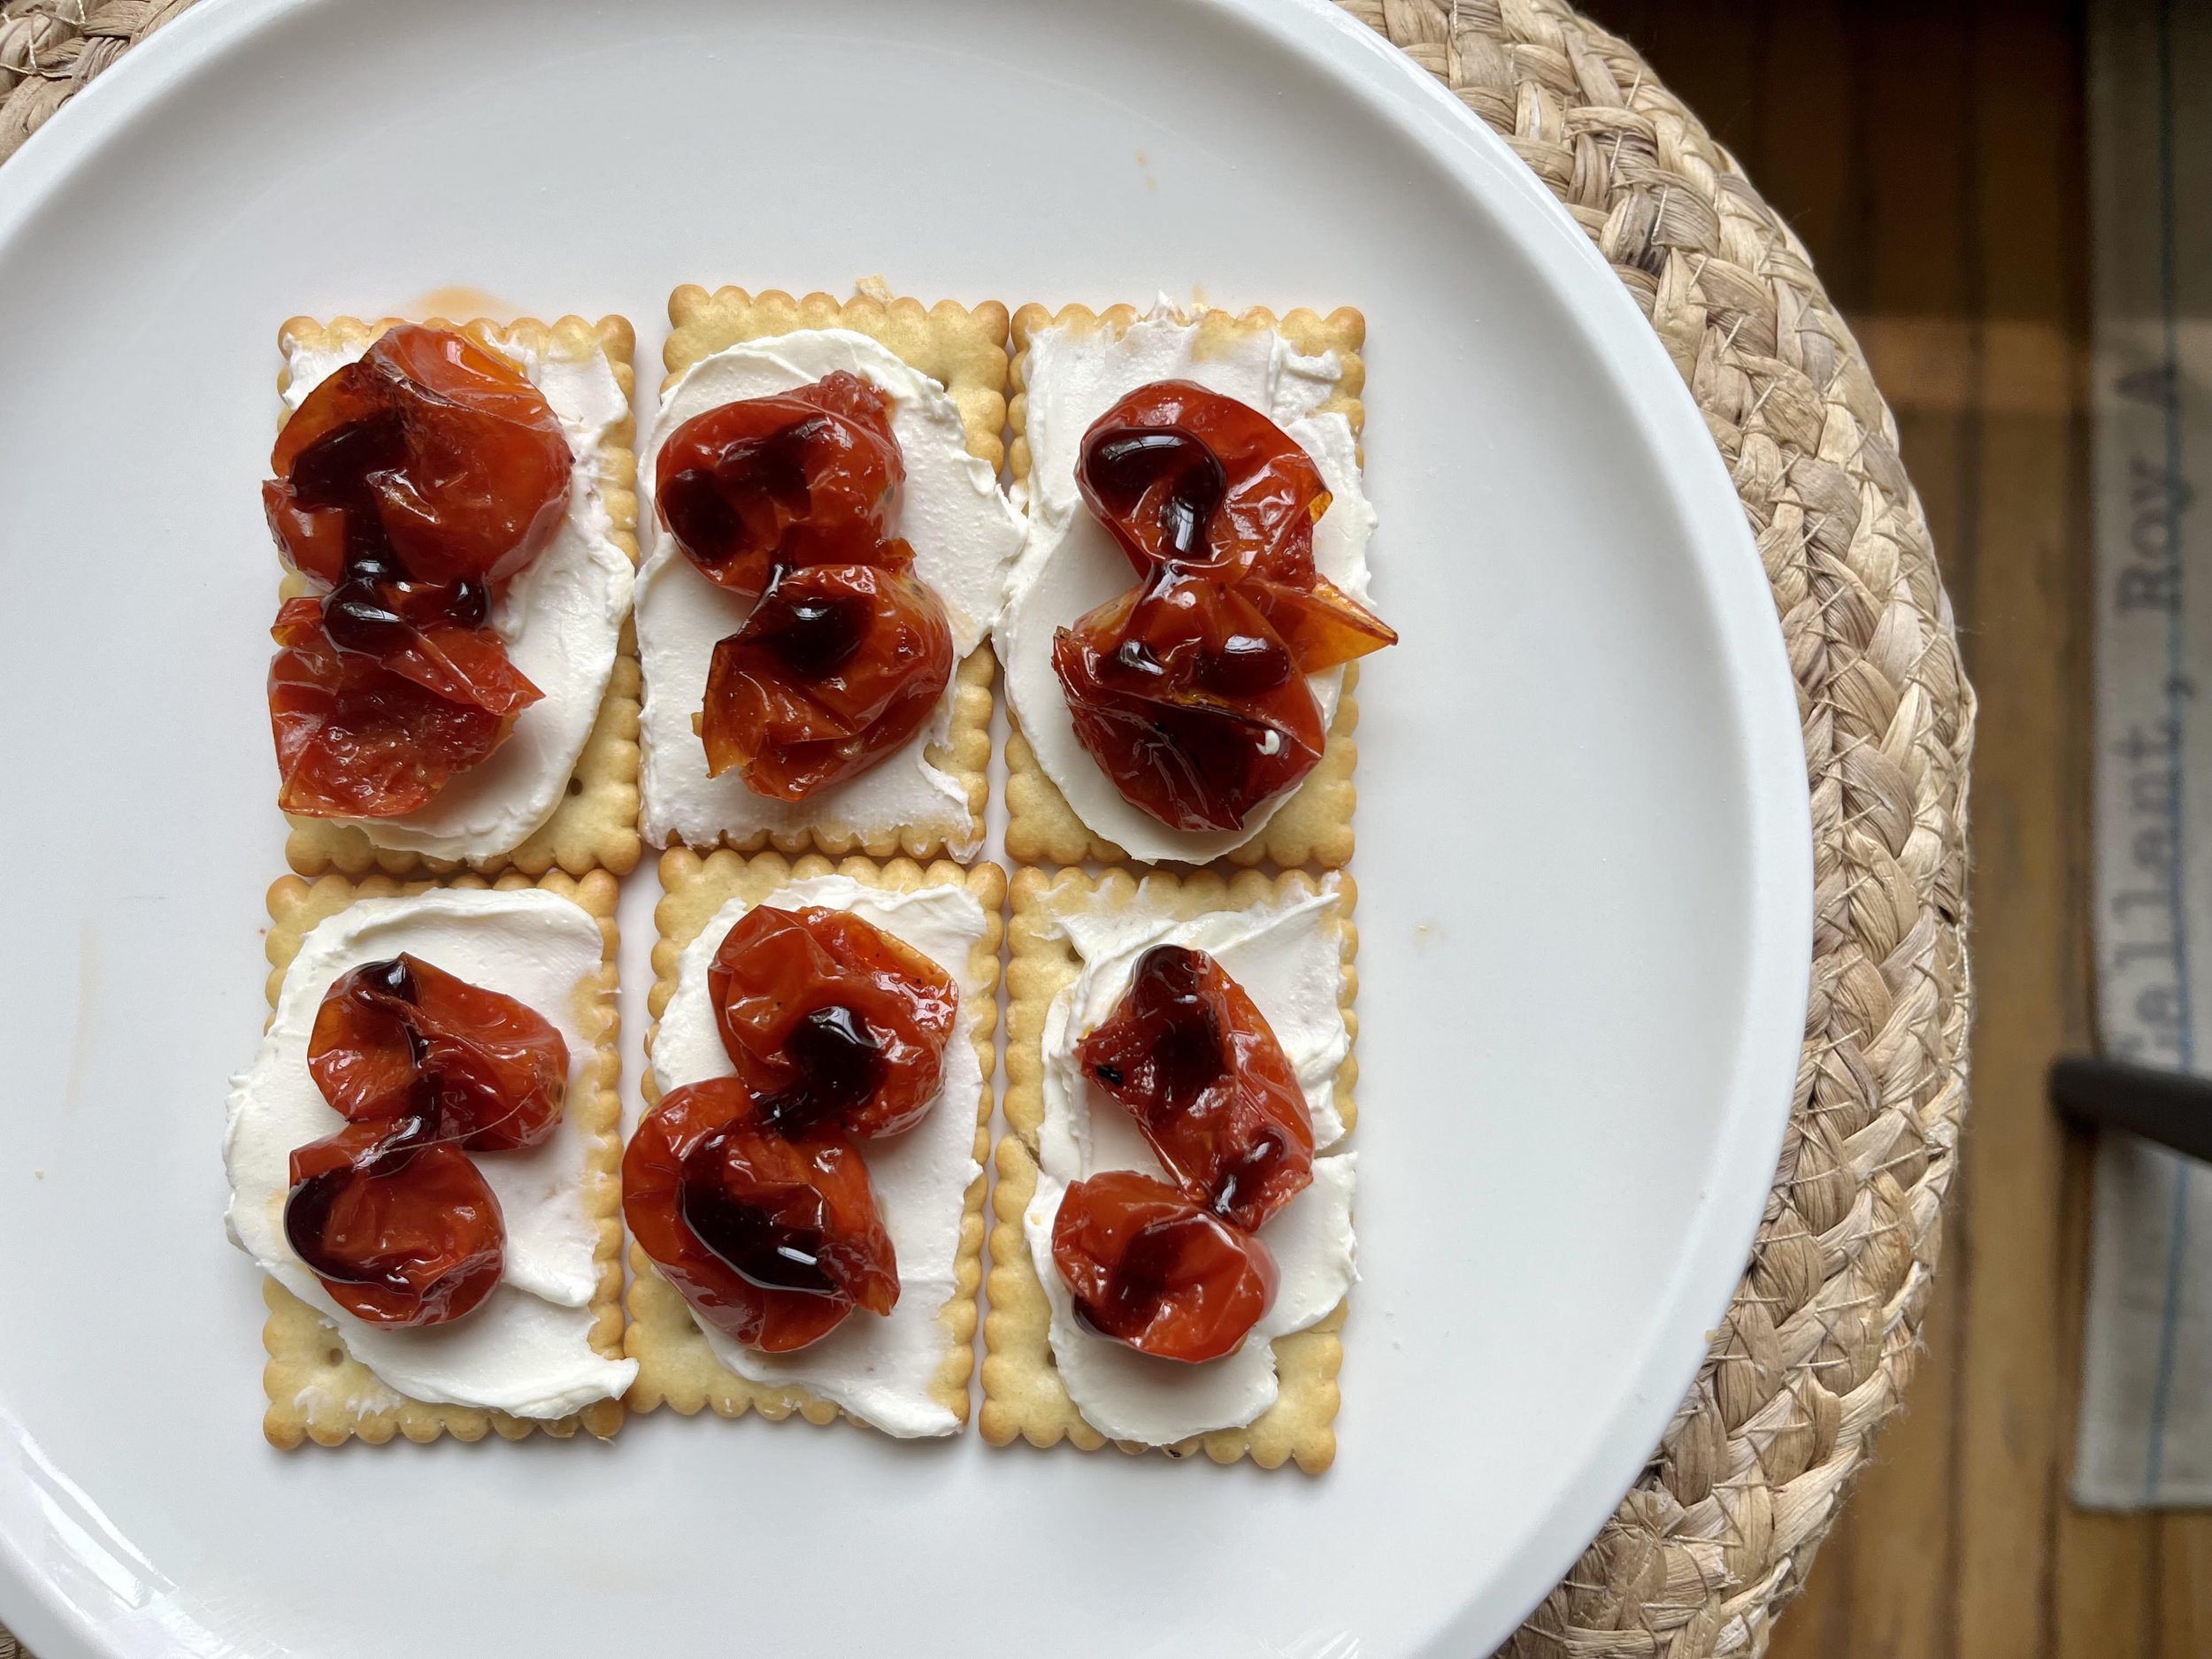
Let the tomatoes cool, and then enjoy as a makeshift pasta sauce, a topper for ricotta toast, or fold into a frittata, stir-fry, or wrap. Alternatively, serve as an appetizer, like pictured below. We spread cream cheese on crackers, added 2 roasted grape tomatoes, and drizzled balsamic glaze on top. You could use a different cheese or cracker and achieve the same effect! The roasted flavour really intensifies the sweetness of these little tomatoes, and brings them to the next level!
These roasted tomatoes can also be transferred to a freezer-safe container or bag and frozen for later use.
Recipe developed & photographed by Alex Chesney, RD