Nutrition Facts tables give you a clear snapshot of what’s in the food you eat, helping you compare products to make informed choices. A nutrition facts table lists calories, nutrients, and the percent daily value (% DV) for a standard serving. So how do you actually use these?
Start by checking the serving size.
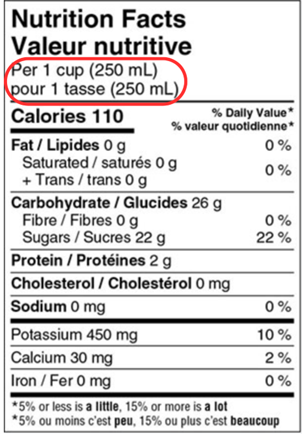
The serving size is located at the top of the table. All the information below is based on this amount, so it’s important to compare it to how much you eat. For example, if the serving size is one cup but you eat two, you’ll need to double the calories and nutrient amounts listed. In the example below, this would mean two cups would be 220 calories.
A serving size is not a recommendation of how much of the food to eat or drink but rather represents the amount of food typically eaten by consumers in one sitting. Serving sizes are selected based on reference amounts, which are established by Health Canada based on categories of food.
Understand the percent daily value (% DV).
The % DV helps you see if the food you are eating has a little or a lot of a nutrient.
5% or less DV = a little
15% or more DV = a lot

This tool allows you to compare food items to decide which ones have better sources of nutrients you want more of, and which ones are higher in nutrients you are looking to limit.
Nutrients you may want more of include: fibre, vitamin A, vitamin C, iron, and calcium
Nutrients you may want to limit include: fat, saturated fat, trans fat, and sodium
Let’s use sodium as an example.
Sodium is a mineral that helps regulate fluid balance and supports nerve and muscle function. Too much sodium can raise blood pressure and increase the risk of heart disease and stroke. You can use the nutrition facts table to compare similar products and choose the one with a lower % DV for sodium.
For example, let’s say you are comparing two burgers.

Here, because the two burgers have the same serving size, you can directly compare the % DV. In this case, if you were looking for a product with less sodium, you would choose product 2.
Make it work for you.
Choosing the healthier option isn’t always straightforward. Sometimes one product might be lower in saturated fat but higher in sodium, while another might be higher in saturated fat but lower in sodium. That’s why reading a Nutrition Facts table isn’t about finding a “perfect” food—it’s about understanding what’s in your food so you can make choices that fit your needs.
References:
Unlock Food [Internet]. Canada: Dietitians of Canada; [updated 2023 Jul 6; cited 2025 Aug 15]. Understanding food labels in canada; [about 7 screens]. Available from: https://www.unlockfood.ca/en/Articles/Nutrition-Labelling/Understanding-Food-Labels-in-Canada.aspx.
Unlock food [Internet]. Canada: Dietitians of Canada; [updated 2019 Jan 29; cited 2025 Aug 15]. Get the scoop on salt; [about 4 screens]. Available from: https://www.unlockfood.ca/en/Articles/Heart-Health/Get-the-Scoop-on-Salt.aspx.
Alberta Health Services [Internet]. Alberta: Alberta Health Services, Nutrition Services; [updated 2019 Jul; cited 2025 Aug 15]. Label reading the healthy way; [about 4 screens]. Available from: https://www.albertahealthservices.ca/assets/info/nutrition/if-nfs-label-reading.pdf
Health Canada [Internet]. Ottawa: Government of Canada; [updated 2024 Sep 5; cited 2025 Aug 15]. Nutrition labelling: nutrition facts table; [about 5 screens]. Available from: https://www.canada.ca/en/health-canada/services/food-nutrition/nutrition-labelling/nutrition-facts-tables.html
Health Canada [Internet]. Ottawa: Government of Canada; [updated 2025 Feb 25; cited 2025 Aug 15]. Nutrition labelling - Table of reference amounts for food; [about 100 screens]. Available from: https://www.canada.ca/en/health-canada/services/technical-documents-labelling-requirements/nutrition-labelling-table-reference-amounts-food.html